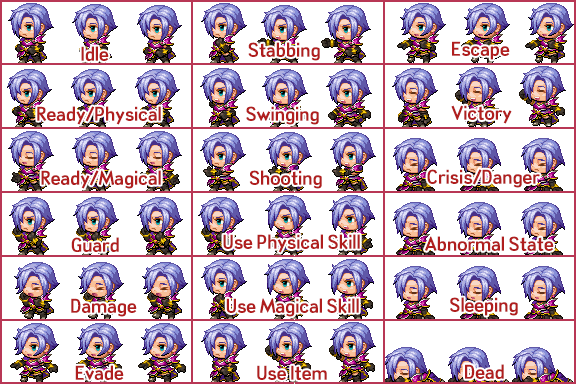
So after a few comments yesterday about the sideview battler sprites not displaying the correct weapons, I did a bit of digging. On the official RPG Maker forums, Archeia (one of the main engine developers) posted about the default asset standards and guidelines. Here’s how the sideview batter spritesheet is normally configured:
Asset Standards Template by Archeia
Each section is a three-frame animation, with a total of EIGHTEEN different animations. Now, the engine is looking for specific motions when an ability is used, such as taking damage or spellcasting. Now, here’s the template for the Time Fantasy assets that I’m using:
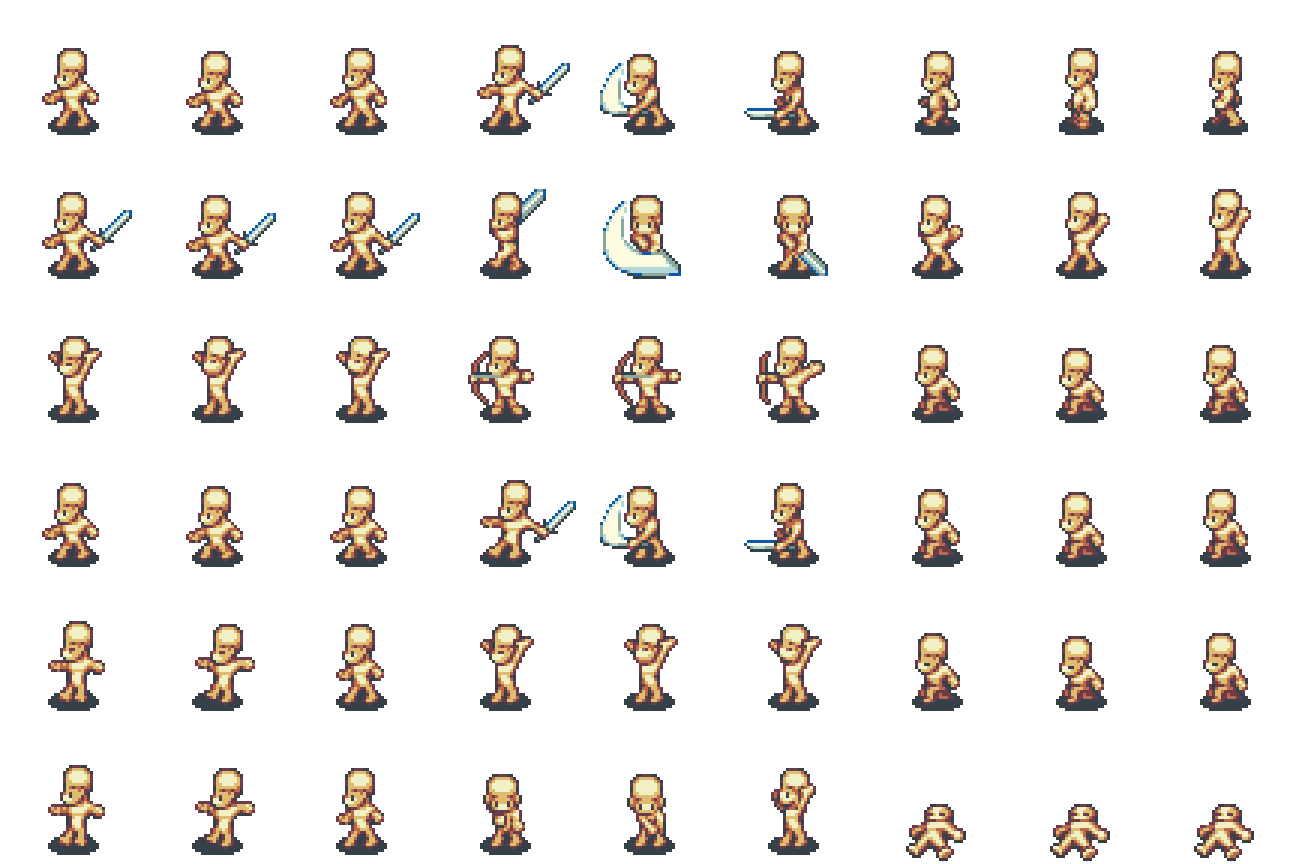
Time Fantasy Sideview Battler Template – Sword
Now, you may notice that the weapon graphic is actually part of the sideview battler sheet. This isn’t normally how RMMV handles its sideview animations. I think that this is the source of my problems. Instead of tyring to rebuild the graphics to conform (which will take too much time), I’m going to have to look into Plugins that allow me to circumvent this issue.
I may have a promising lead in some of Yanfly’s Plugins; namely the Action Sequence Packs. These plugins require both the Yanfly Core Engine and the Yanfly Battle Engine Core in order to function, but they allow me to adjust the way the sideview battle system works. Only problem I’m having is that the plugins are quite complex, and I need to decipher what effects that they can manipulate. Hopefully, I’ll be able to set something up where I can swap out the battler graphics depending on what weapon the character is armed with, which would immediately fix the issue. I’d just need a ton of sideview battlers though!
So I know now what the issue is, and if all goes well, I can fix it. Anyhow, I’ll see you later with some more content!
Today, I’m going to go through how to go through how I create and configue tilesets to use in RPG Maker MV. This may be a bit of a long one, but stick with it; it’s certainly interesting.
Under the Tilesets tab in the database (which if anyone is wondering, is the Icon with the two cogs on it), select a slot for the tileset to go. If there aren’t any free slots, make some more by clicking on the “Change Maximum” button, and entering how many slots you’d like altogether. I’ve already gone ahead and named the tileset I’ll be doing, to save time. I’ll also be referencing my Tileset Plan that I posted in Dev Log #1, so if you don’t know how that works, please check out that post before continuing.
Starting with a blank tileset:
RPG Maker MV’s Interface – Tilesets
I’ve already opened the Tileset Plan, so I can see what’s supposed to go where. Now, in this interface, there are various buttons. General Settings is fairly straigtforward, with the name and mode sections. There are only two modes; Area and World. As this is going to be a Dungeon-style area, we want to leave it default (as it always defaults to Area Mode). Images is where we’re going to be selecting the various tileset components (as mentioned in Dev Log #2), and making them a part of the tileset. The buttons on the right are a bit more interesting; each one selects a specific mode, such as general passability, specific passability, the ability to talk to NPC’s through the object, or whether the floor causes the player HP damage.
Anyway, enough about the interface, let’s start importing assets!
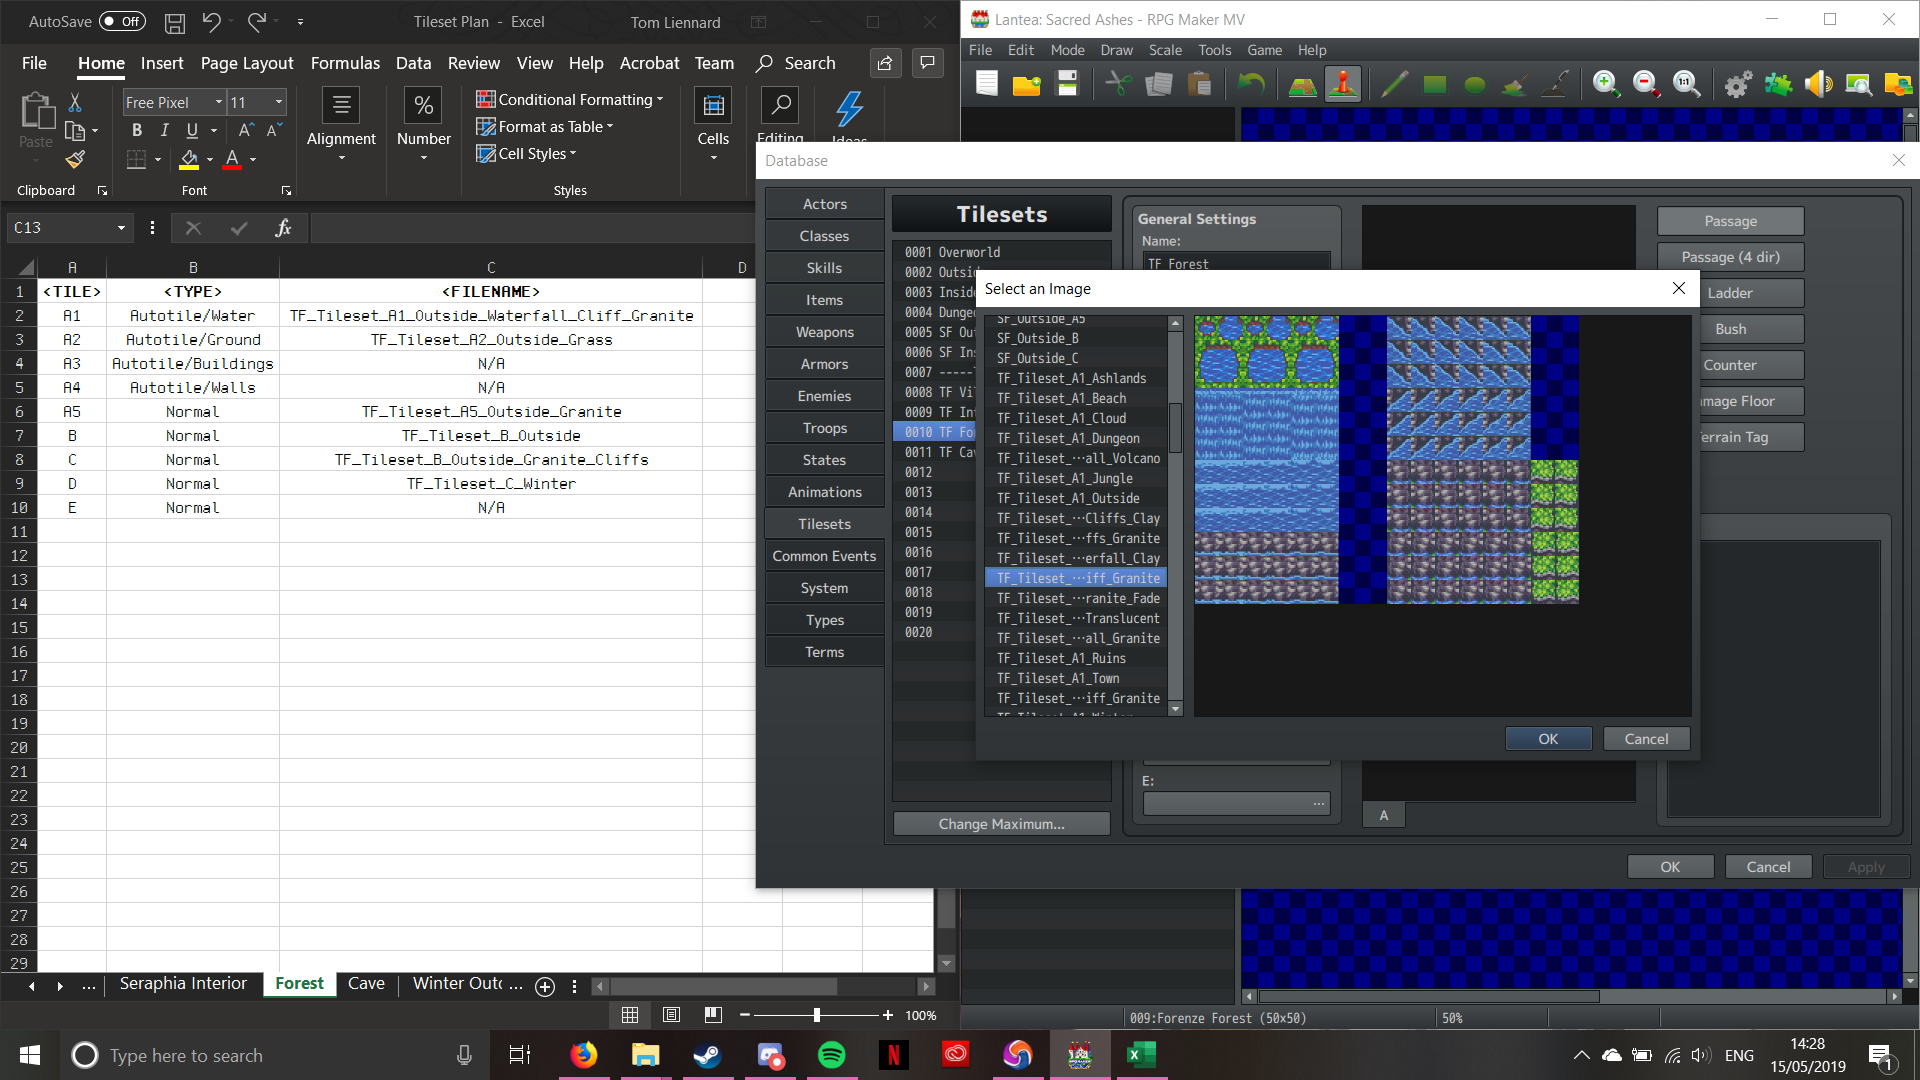
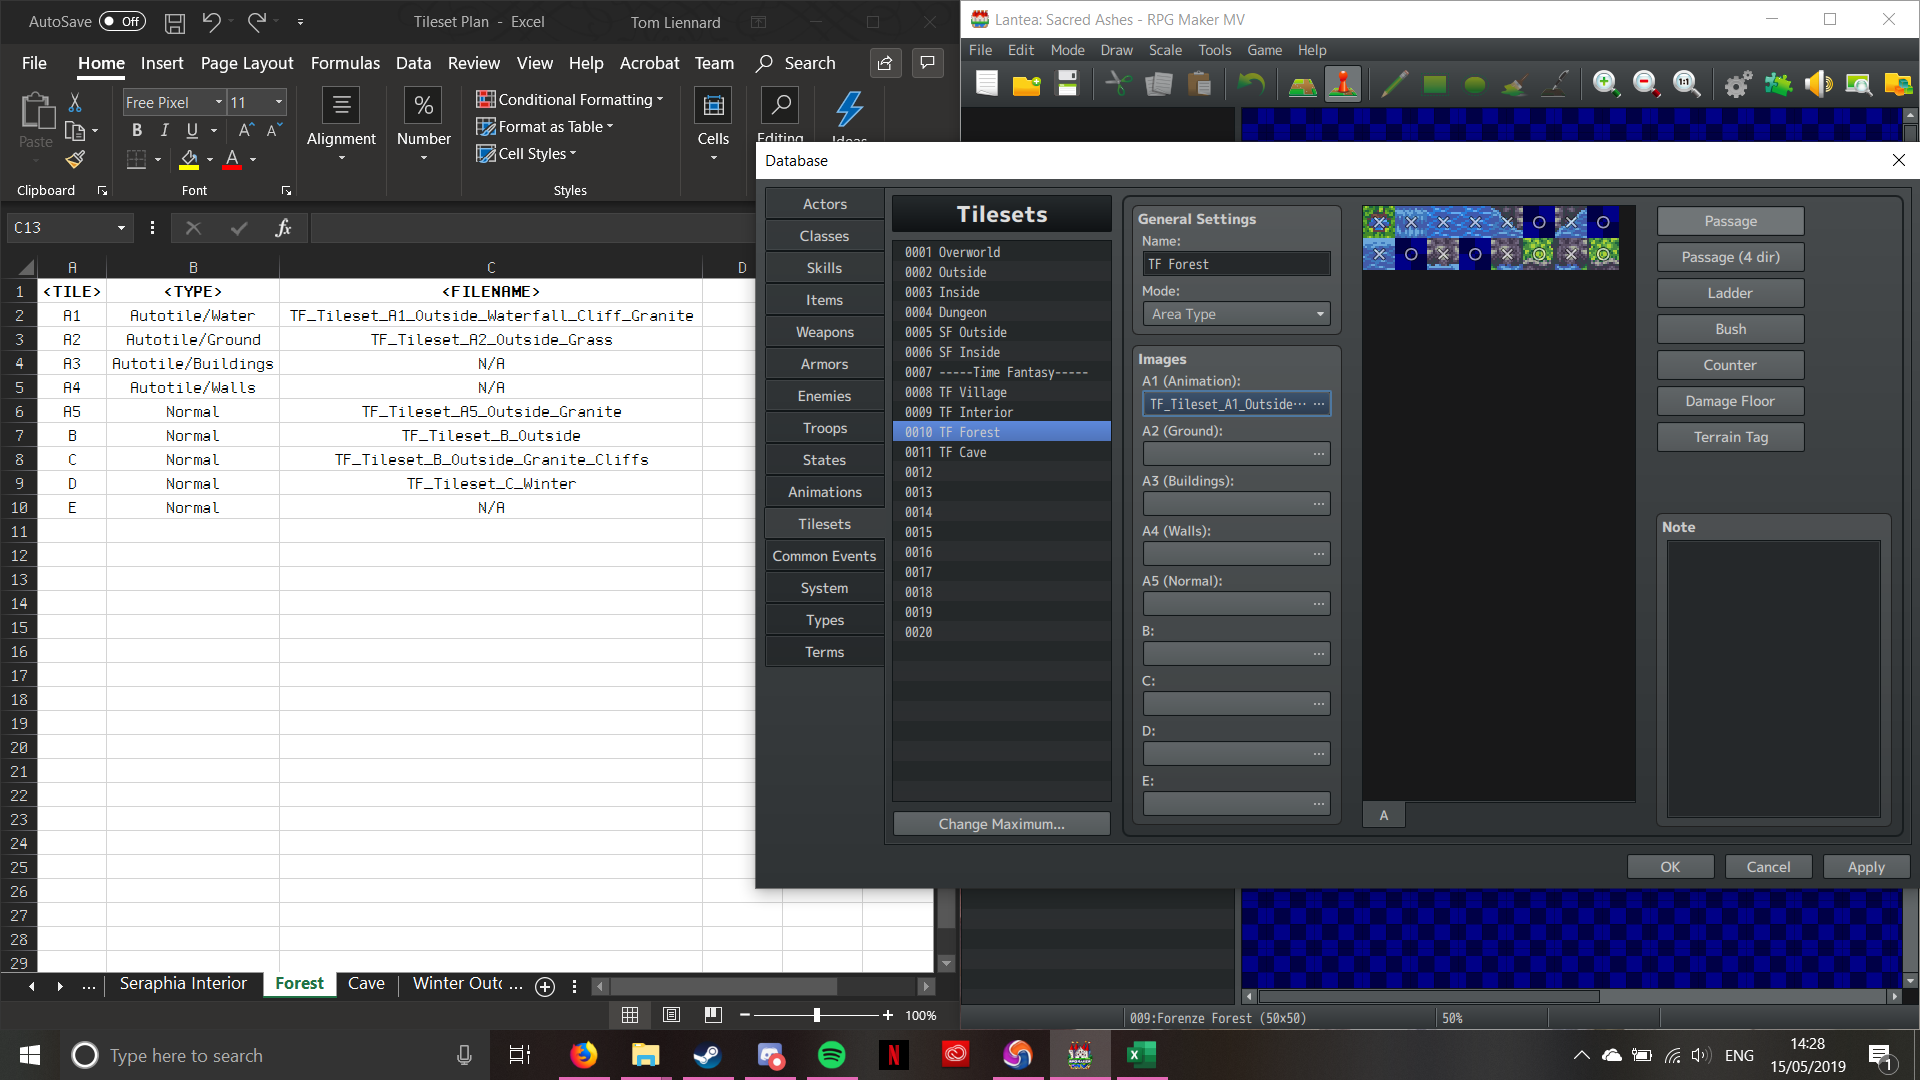
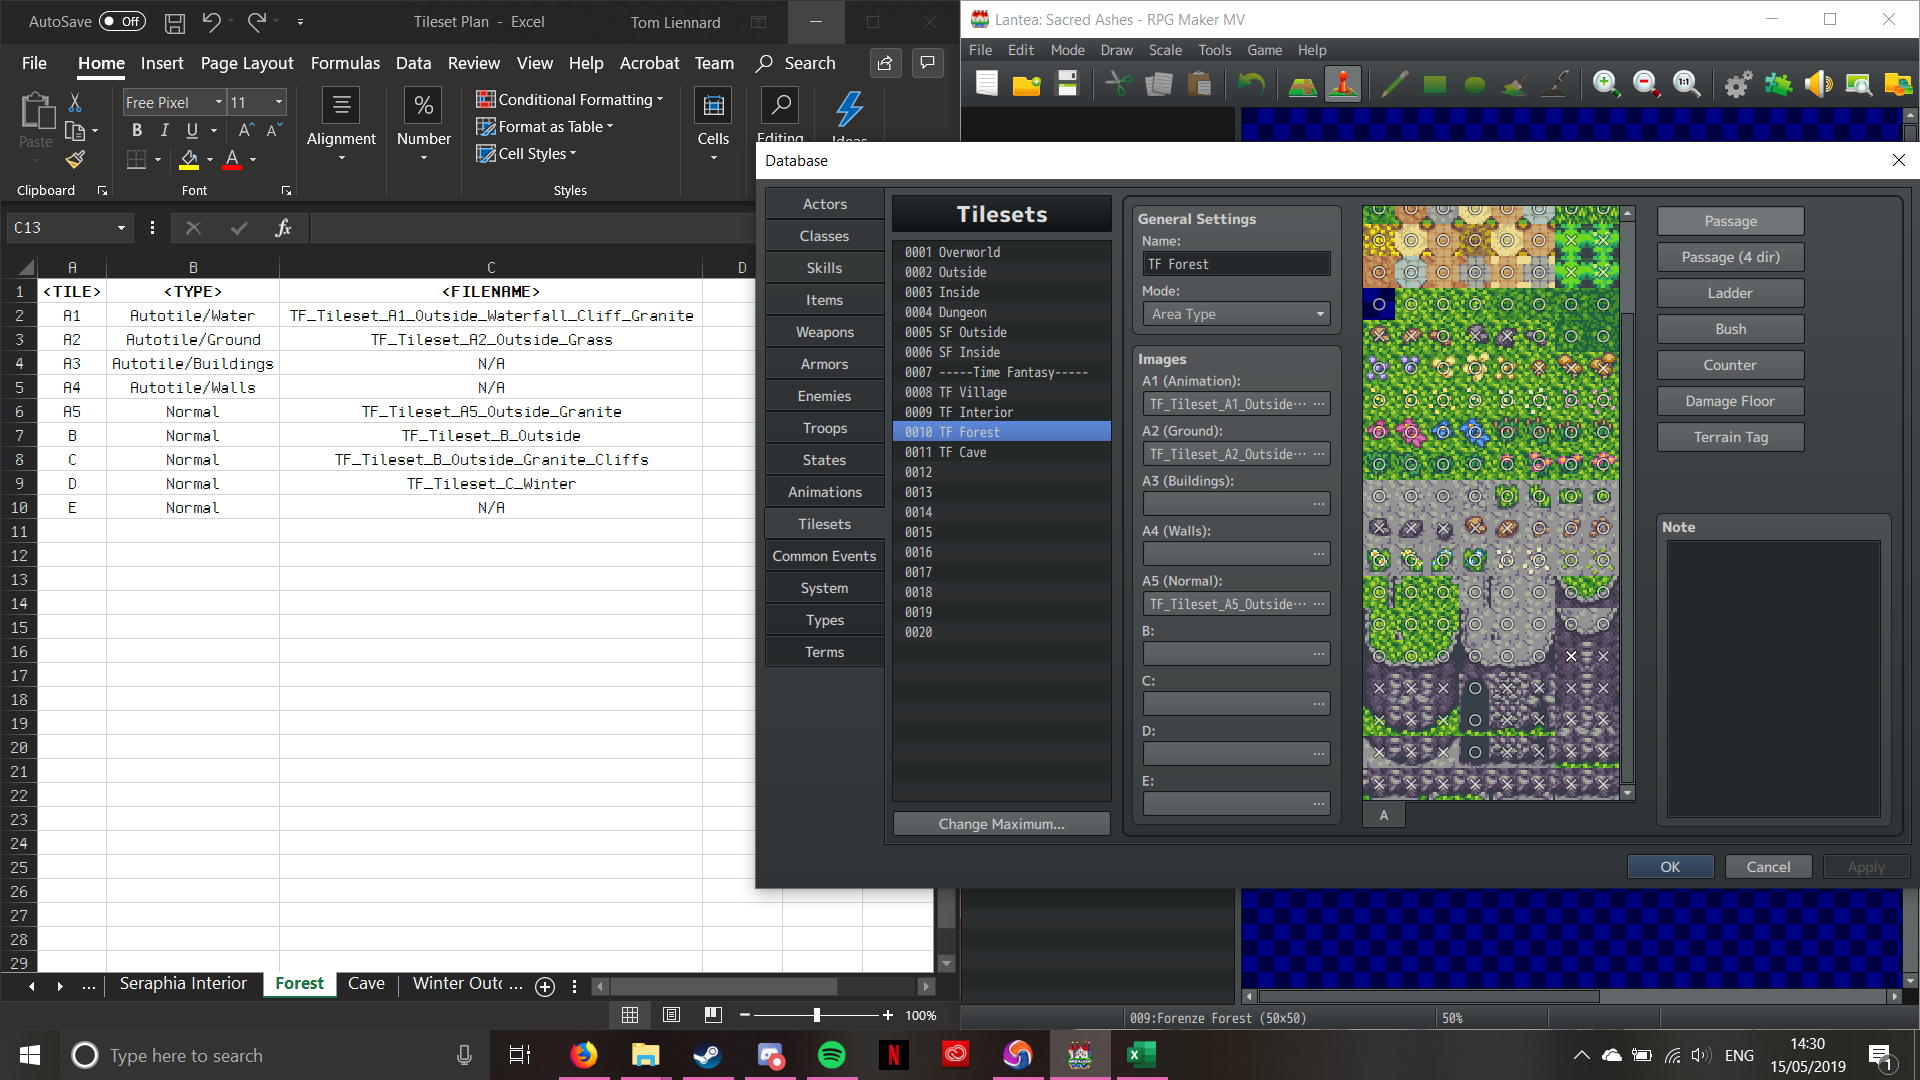
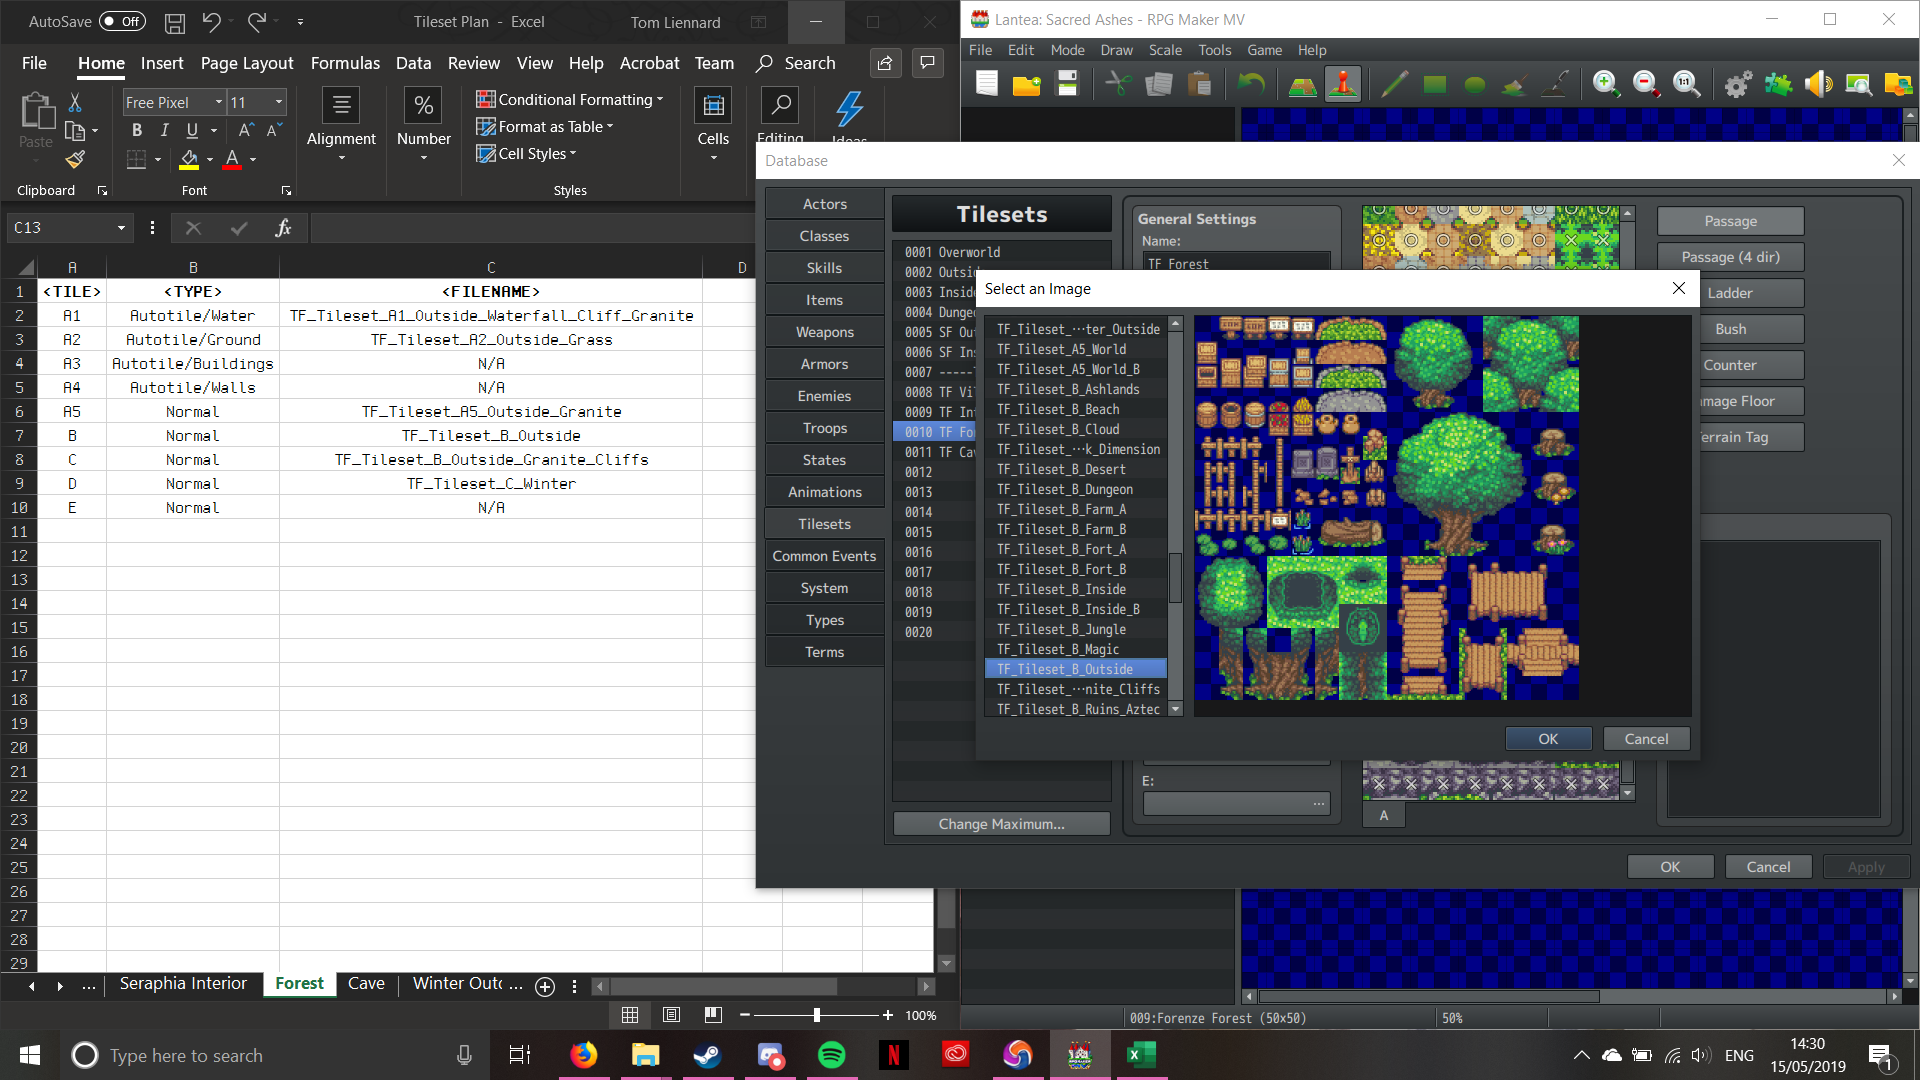
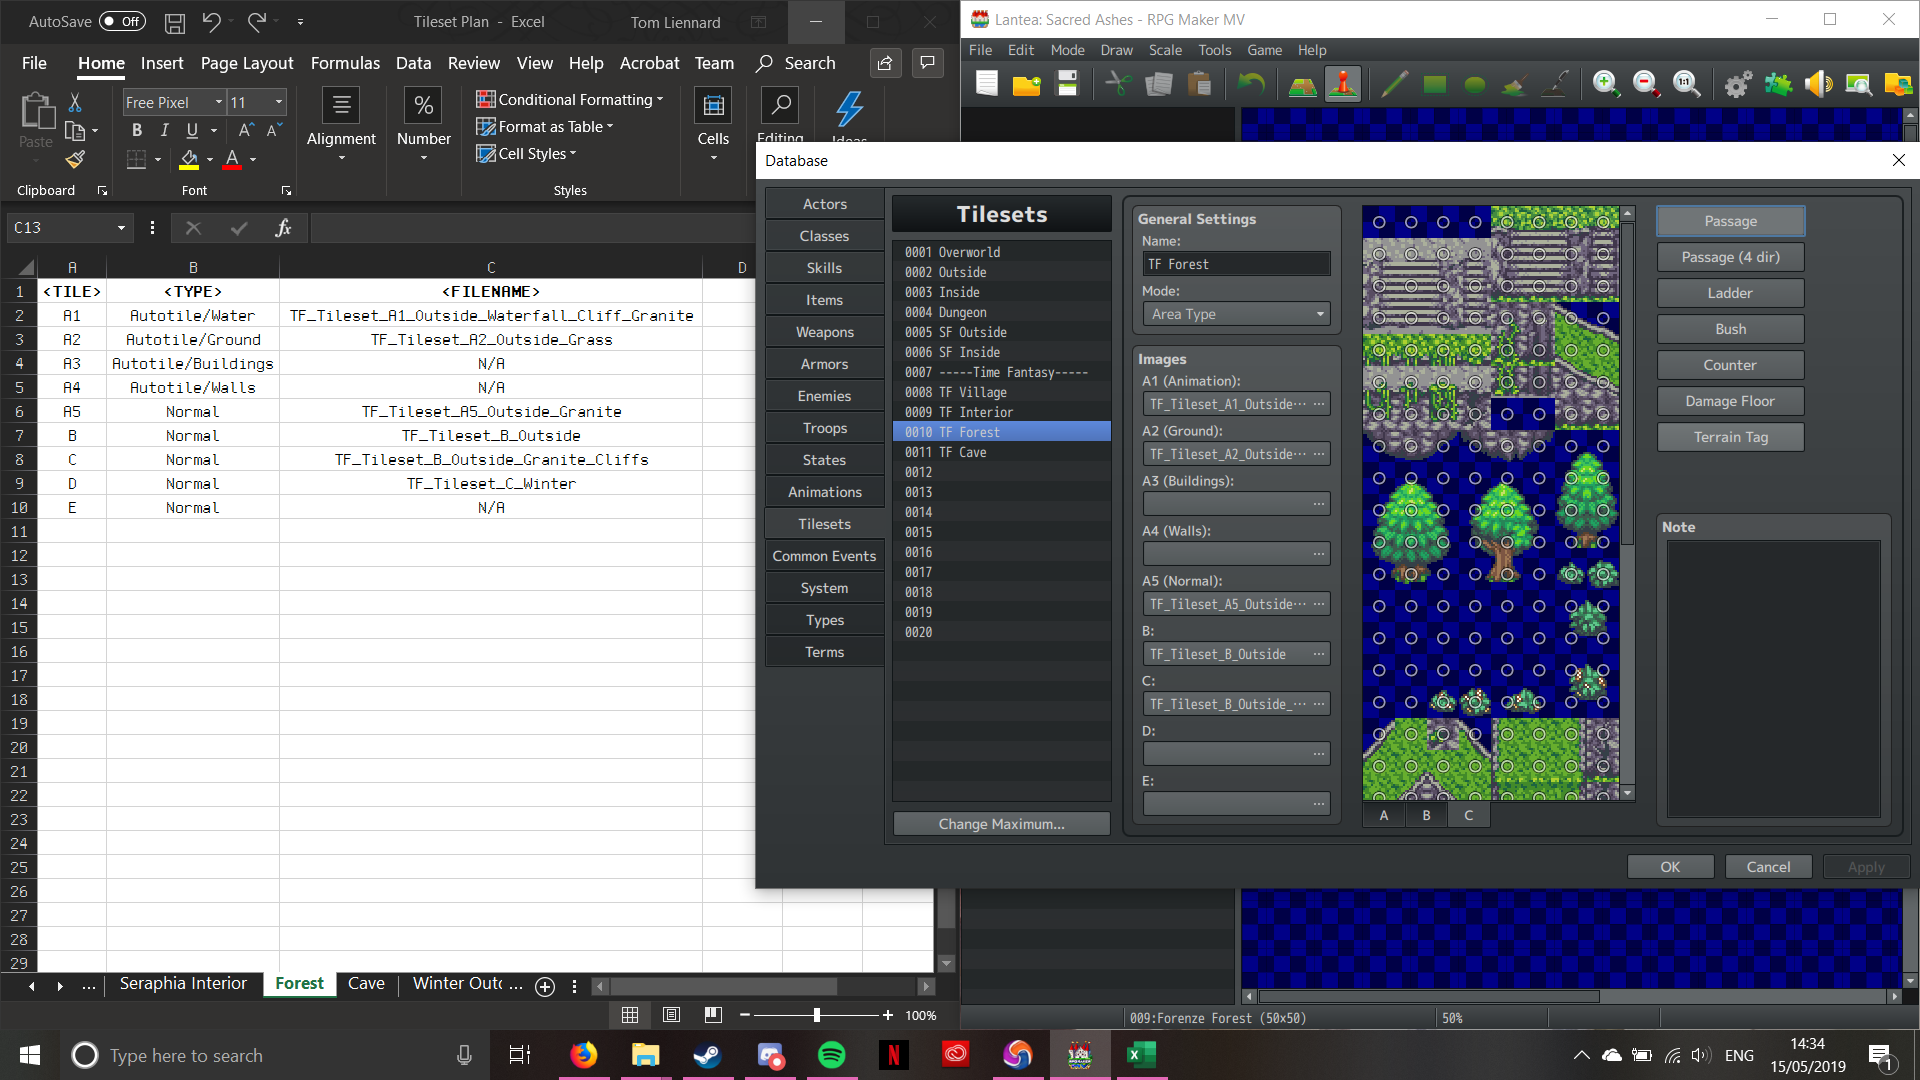
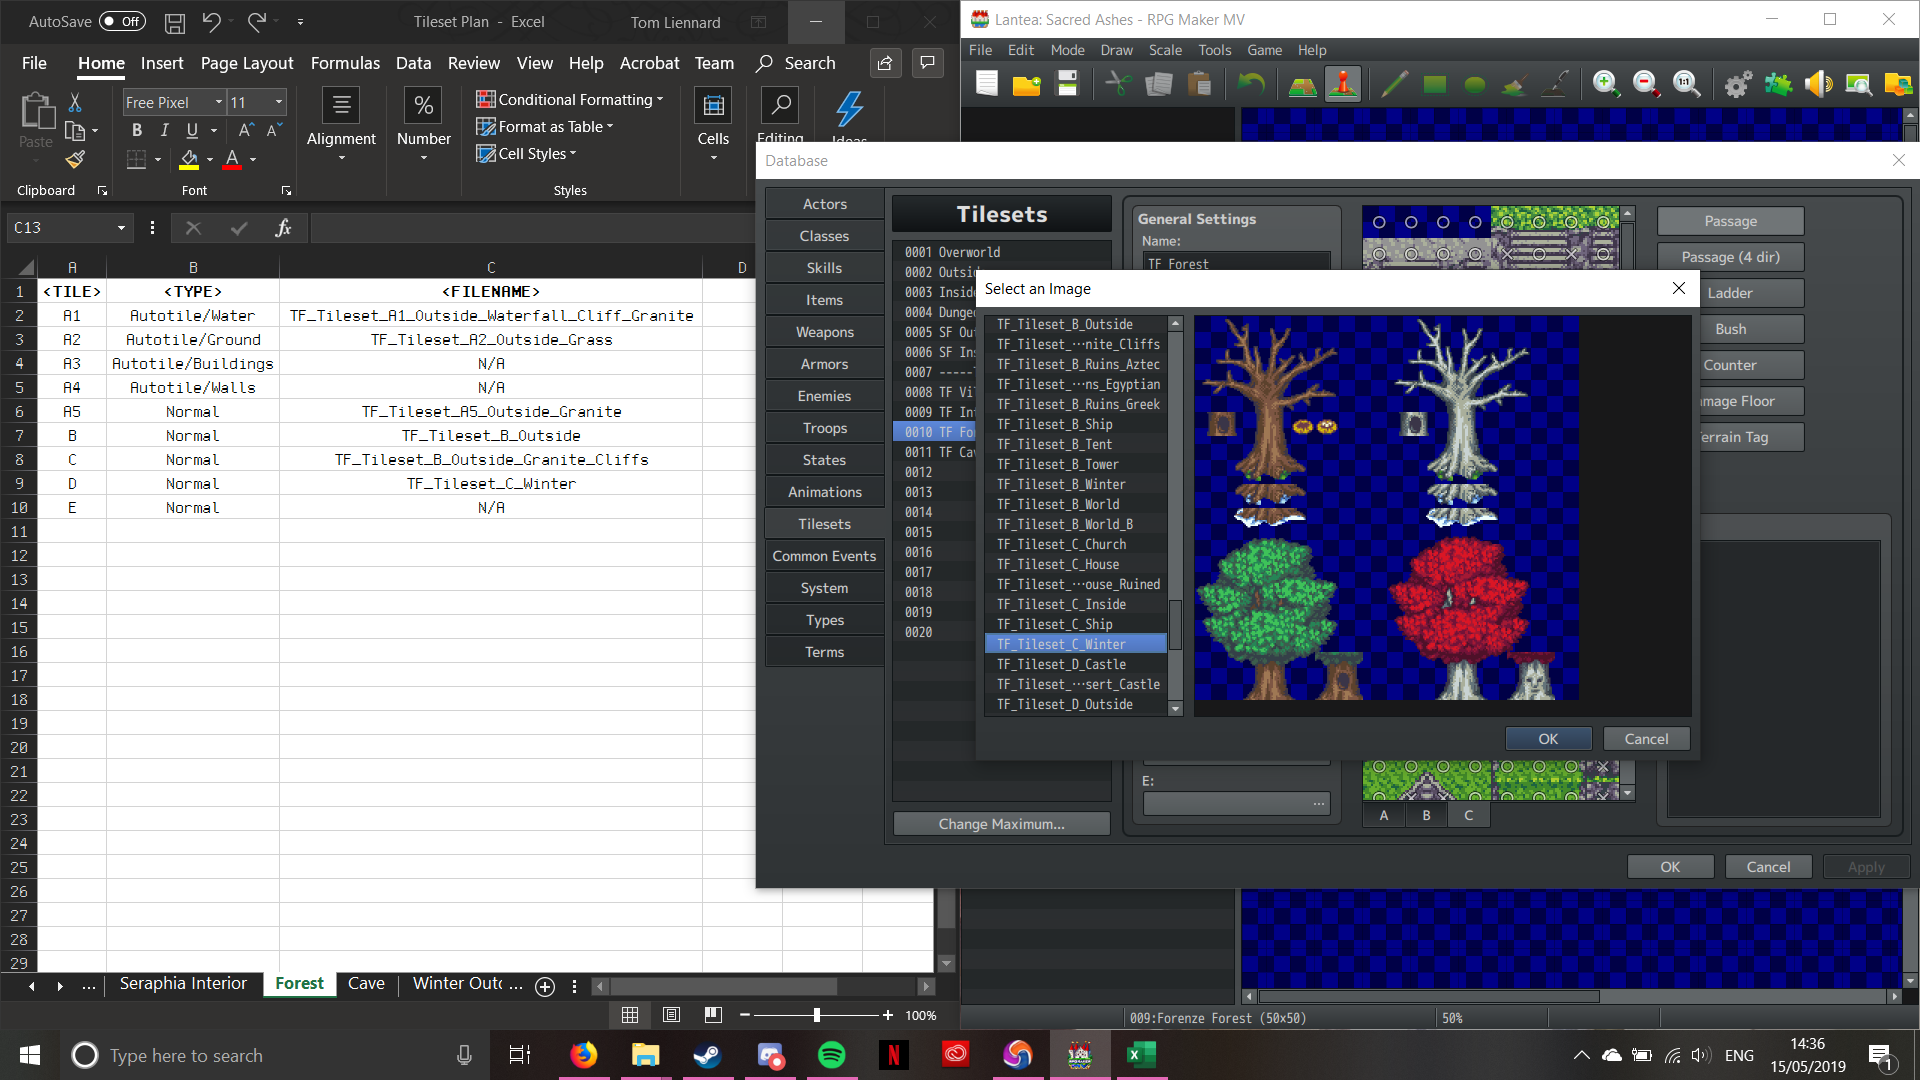
Firstly, we’re going to start with the “A1″ section of the tileset; animated water. By clicking on the box marked “A1 (Animation)”, it brings up the following window:
Pictured above is the A1 Tileset that I’m going to use. If you look, it’s the same one as detailed in the plan. There’s a reason I chose this one; it has waterfalls. I like being able to add some depth to my maps, otherwise they can look a little too flat. Also, if you think about how geography works, water ALWAYSflows downhill. Once I click OK, the tileset will appear in the main interface between “General Settings” and “Passage”.
Sorry about the “Screenshot saved” notification; my laptop hates it when I take screenshots!
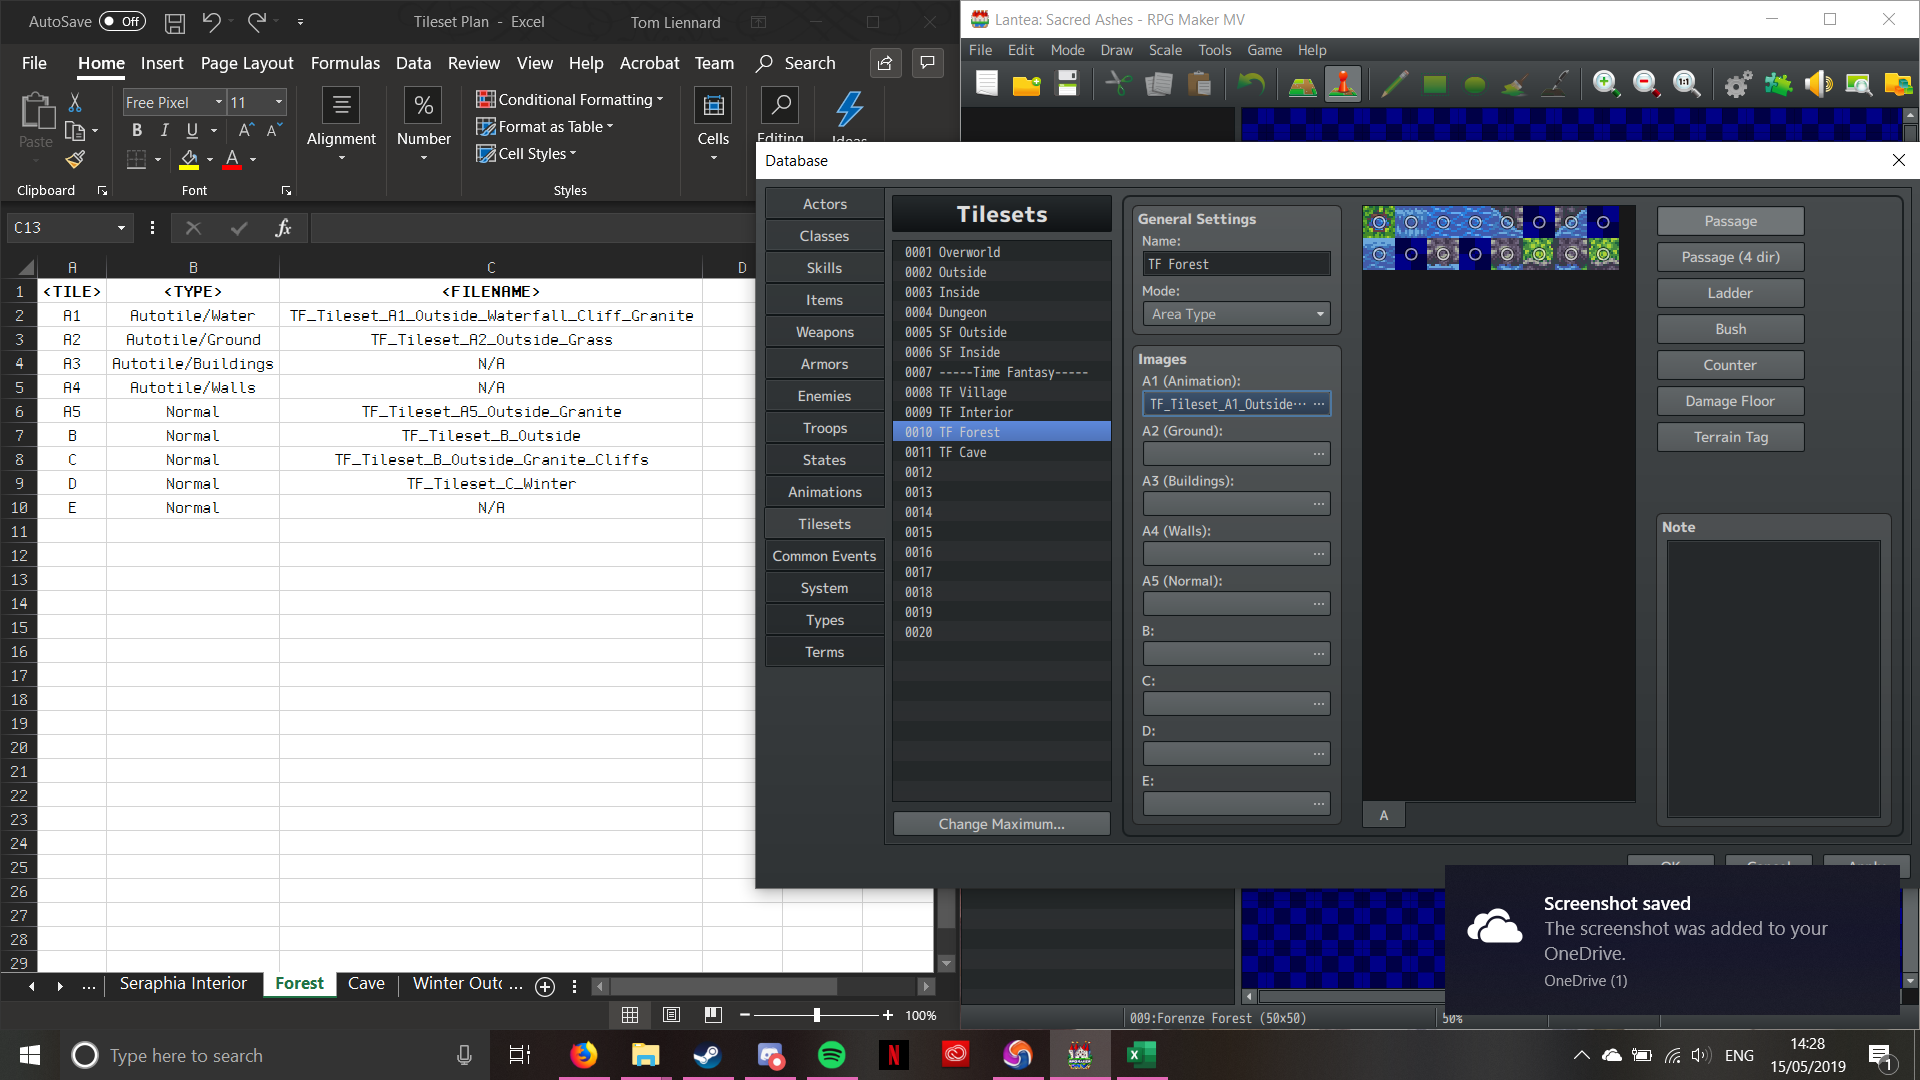
Now that the image has been imported, it’s time to set passability. “A” tileset pieces can only be set to one of two passability settings; Yes (Indicated by a Circle), and No (indicated by a Cross). Here’s how the editor looks once I input the passability:
Passability has been set for the A1 Tile
Now the A1 Tiles all work in the same way at this point, so I’m gonna fast-forward through the process; don’t worry, I’ll stop if anything interesting happens!
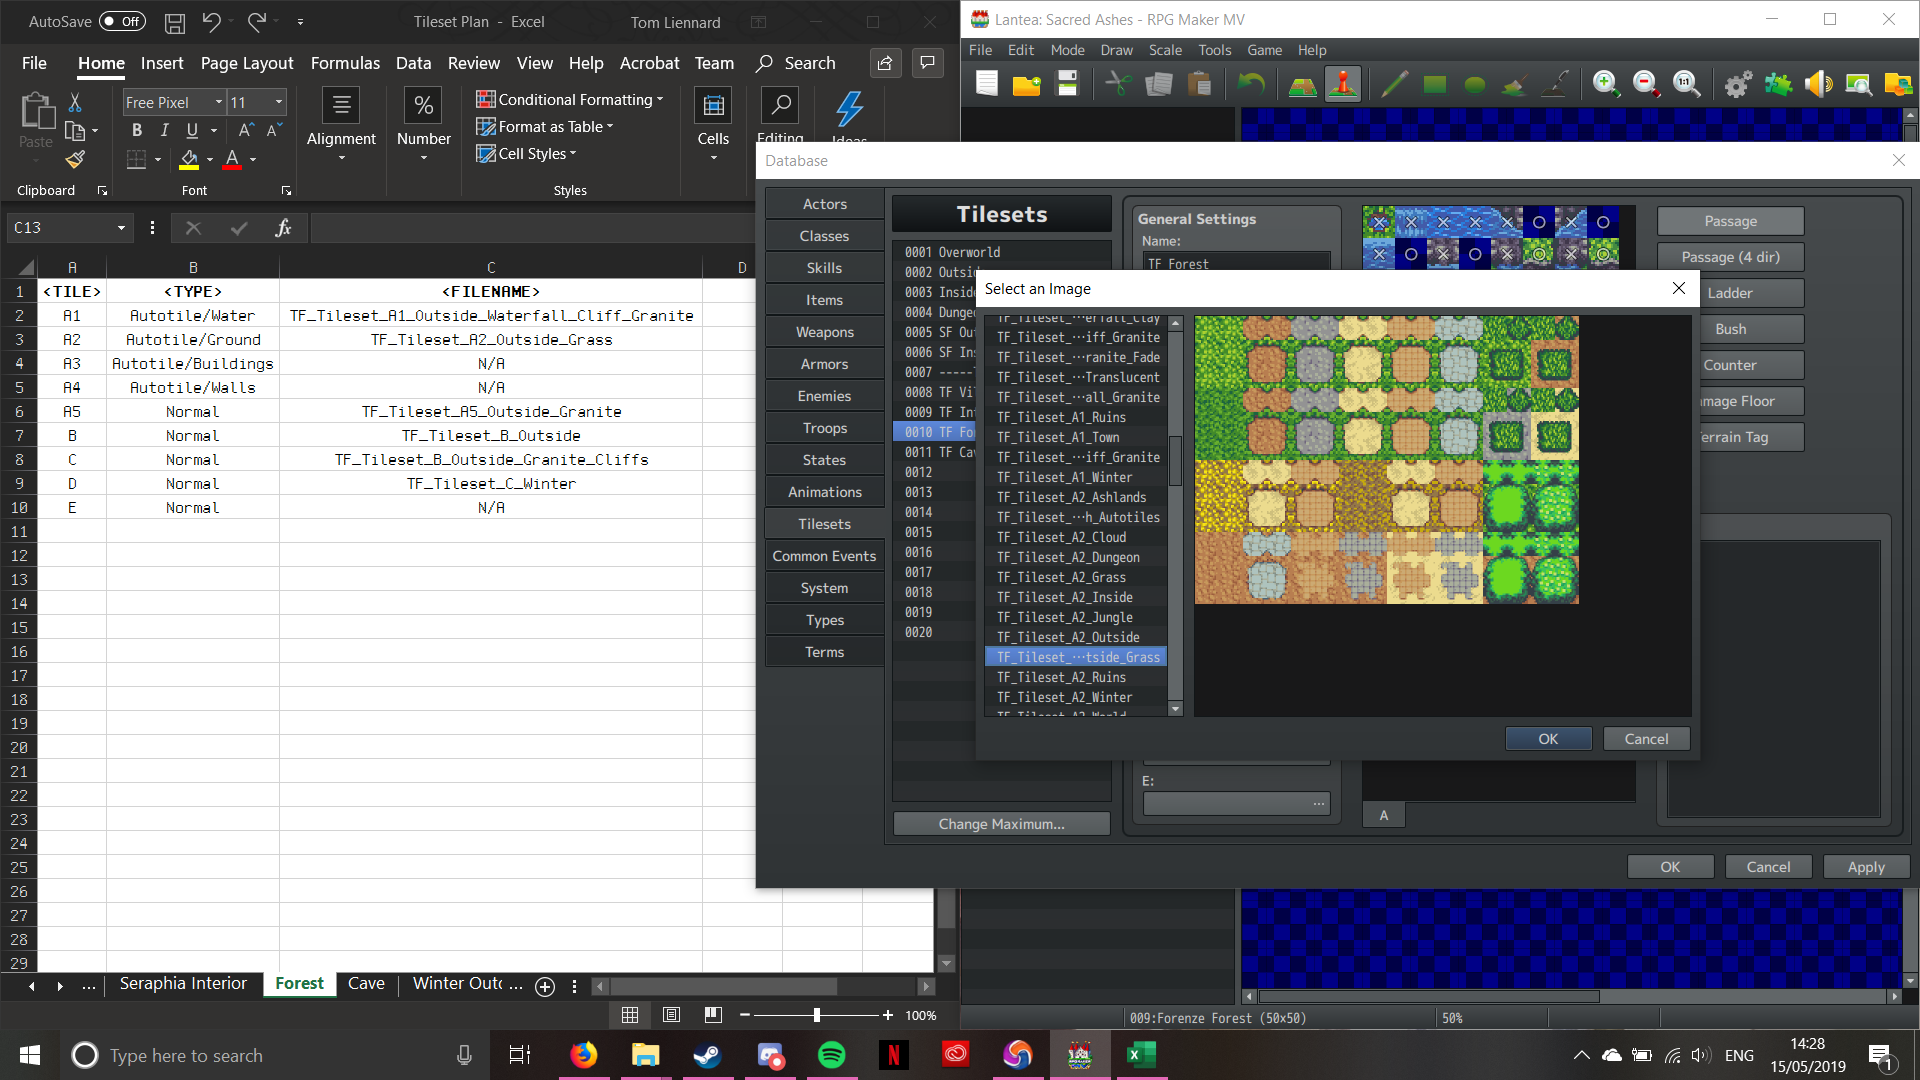
Tileset A2 – Selecting an Image
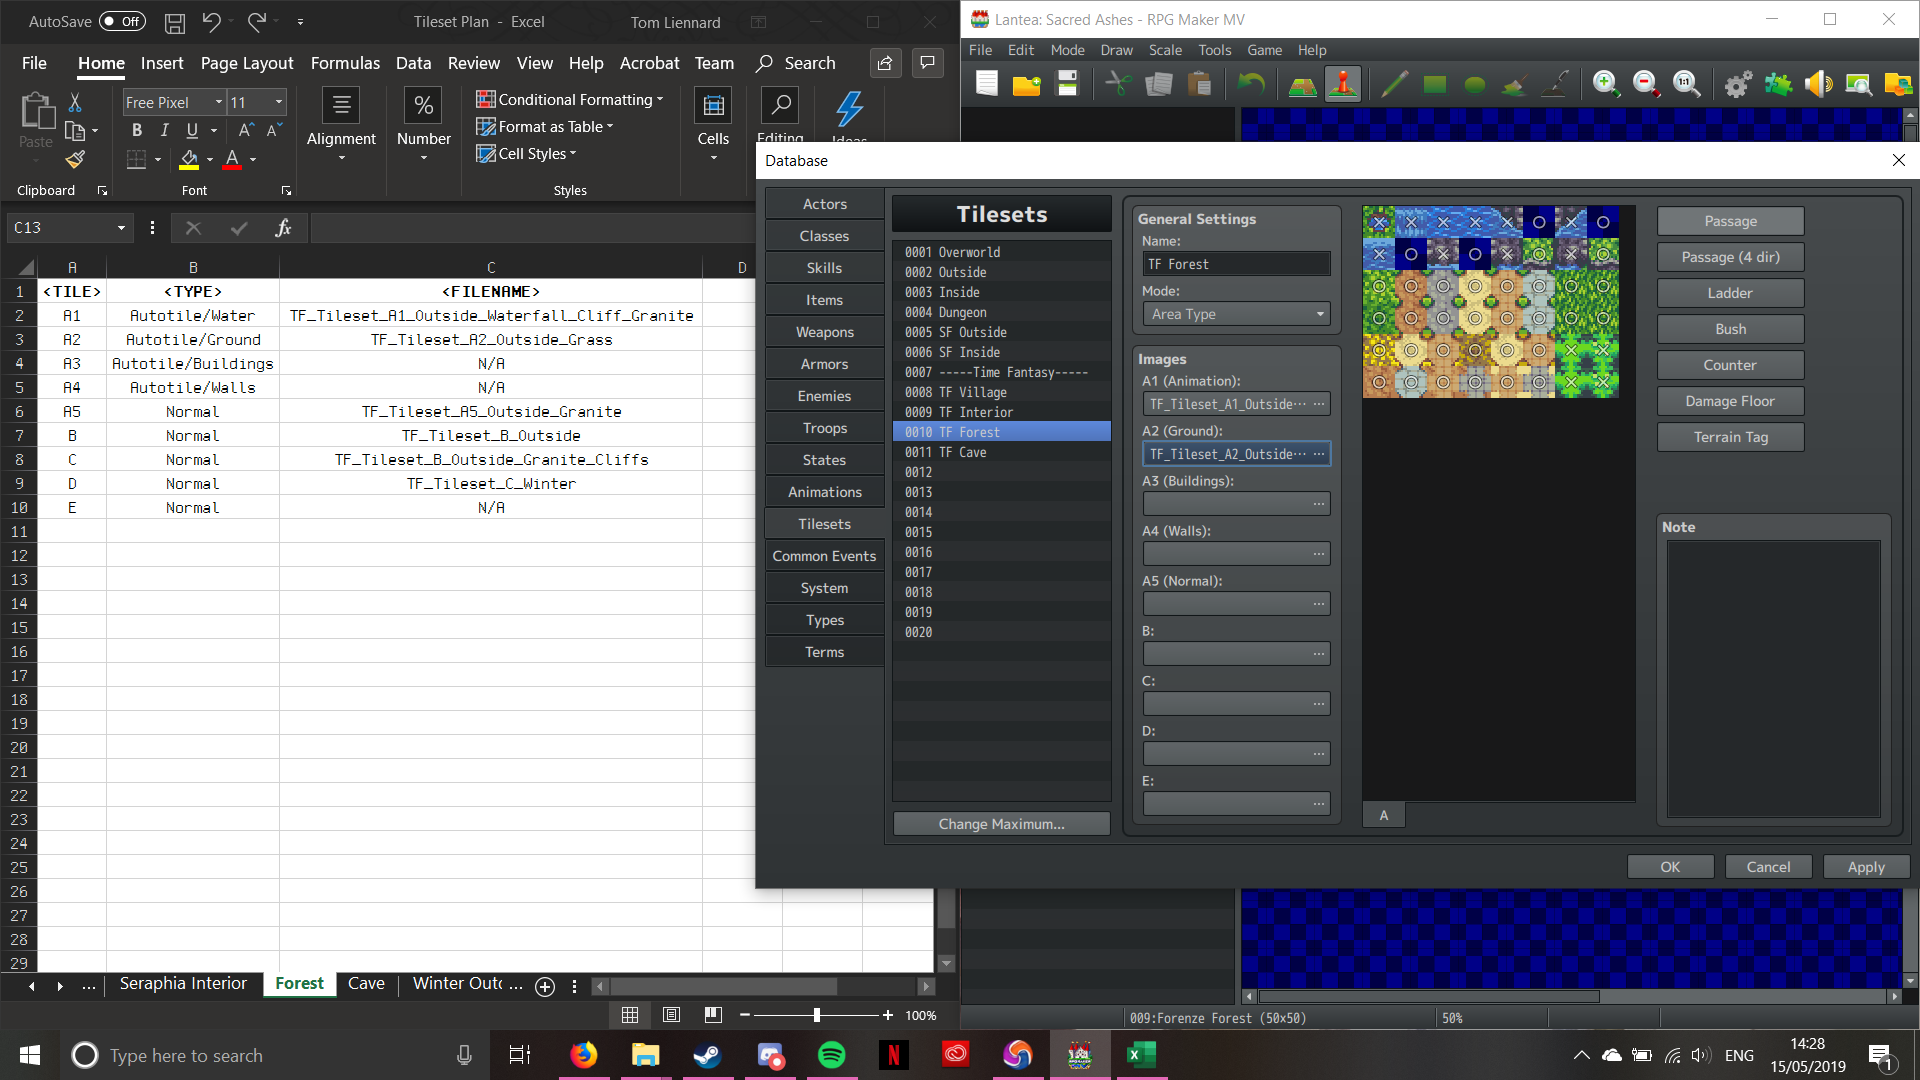
Tileset A2 – Once the Image has been selected
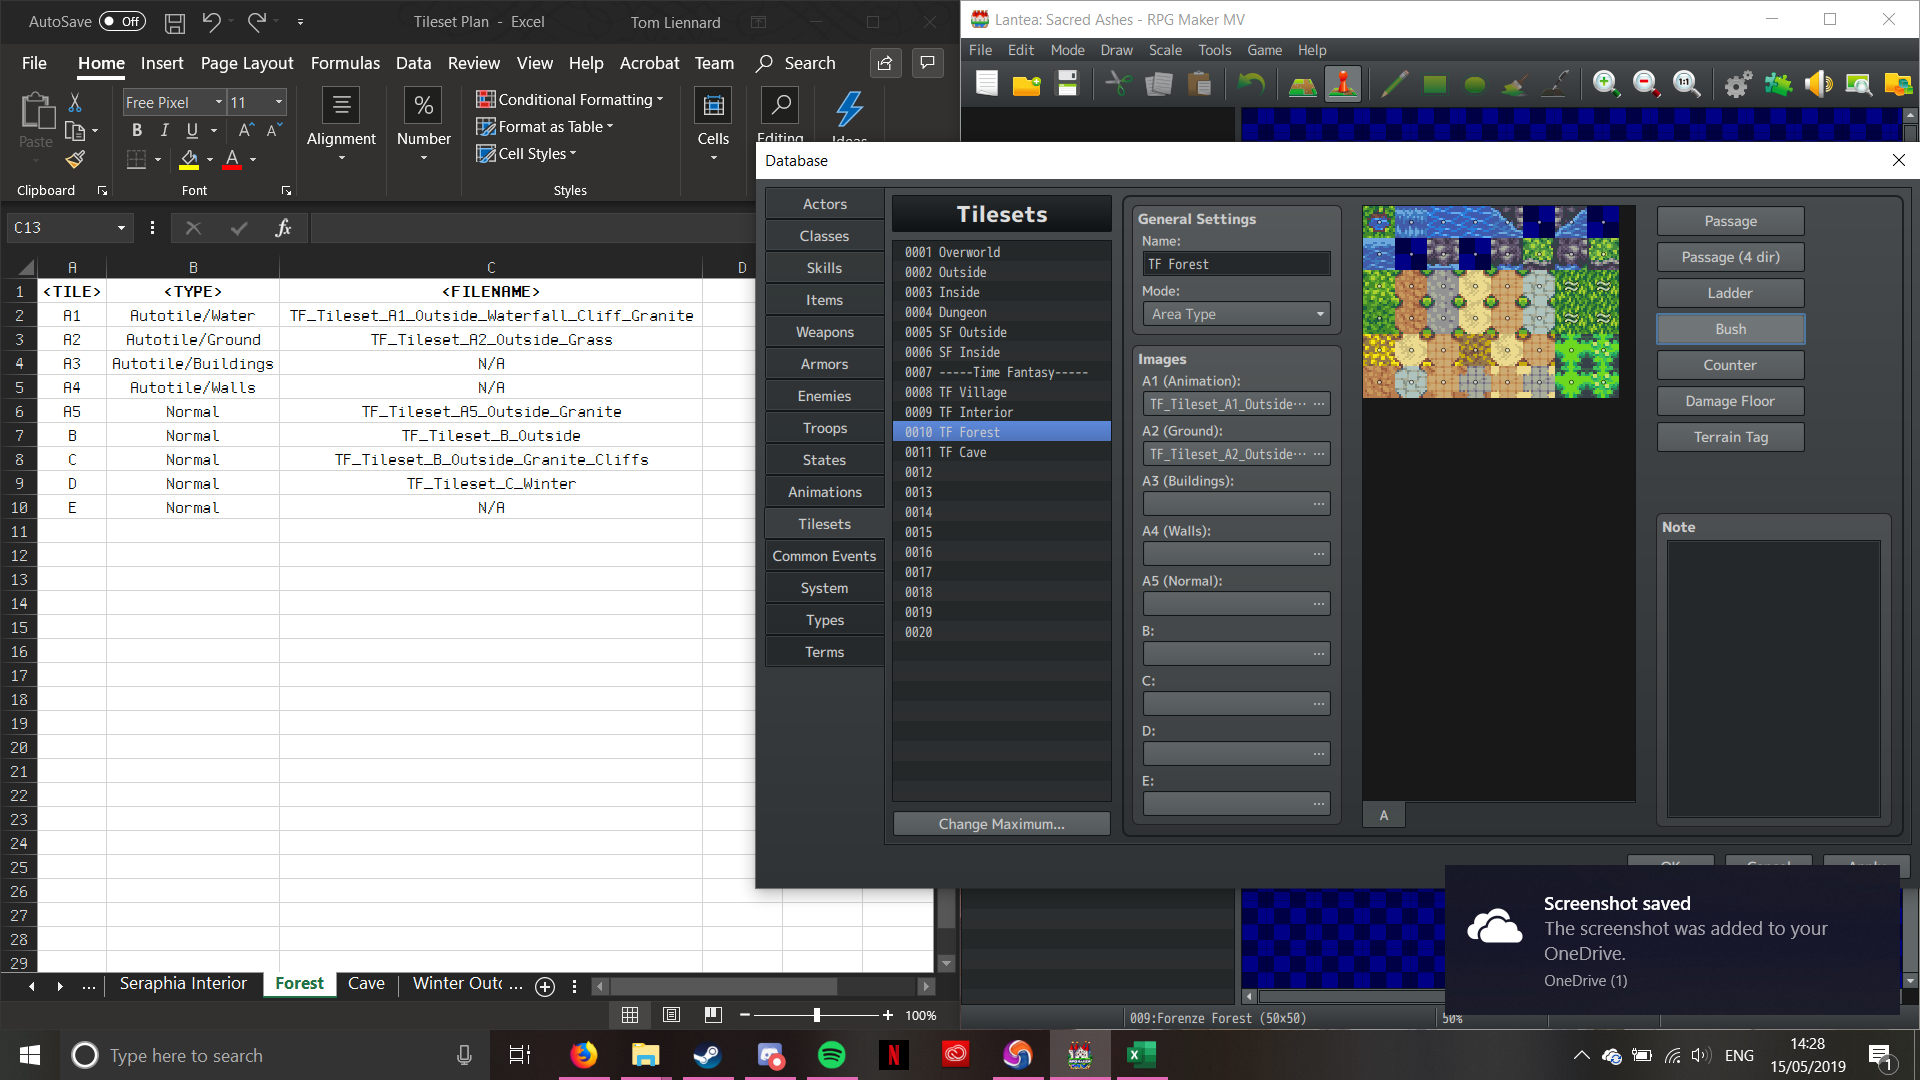
Now this next bit’s a little different, as we’re not setting passability for open ground (leaving them as Circles). The only ones with passability settings are the hedgerows in the bottome right. The grass (upper left of the A2 section) are what’s interesting. We need to “Bush” tag them. Bush-tagging tells the engine to overlay the ground slightly over the feet of the sprites, to create the illusion of walking through tall foliage (Pokémon does this for it’s long grass). To do this, we select the “Bush” option, and then choose the tiles we want Bush-tagged; as follows:
The grass has been Bush-tagged; notice the squigelly lines? (Again, sorry for the OneDrive notification)
Now that’s done, we can move on to the next section. Now according to the plan, we’re not using the A3 or A4 sections of the tileset. We can do this without it being gamebreaking. Moving onto the A5 tile now then. This ones a little different; it’s not an Autotile. It’s a section of graphics designed to interface with Autotiles, but they aren’t Autotiles themselves. Let’s jump forward through the configuration proccess, as there are no new steps or interesting developments:
Tileset A5 – Image Select
Tileset A5 – Passability
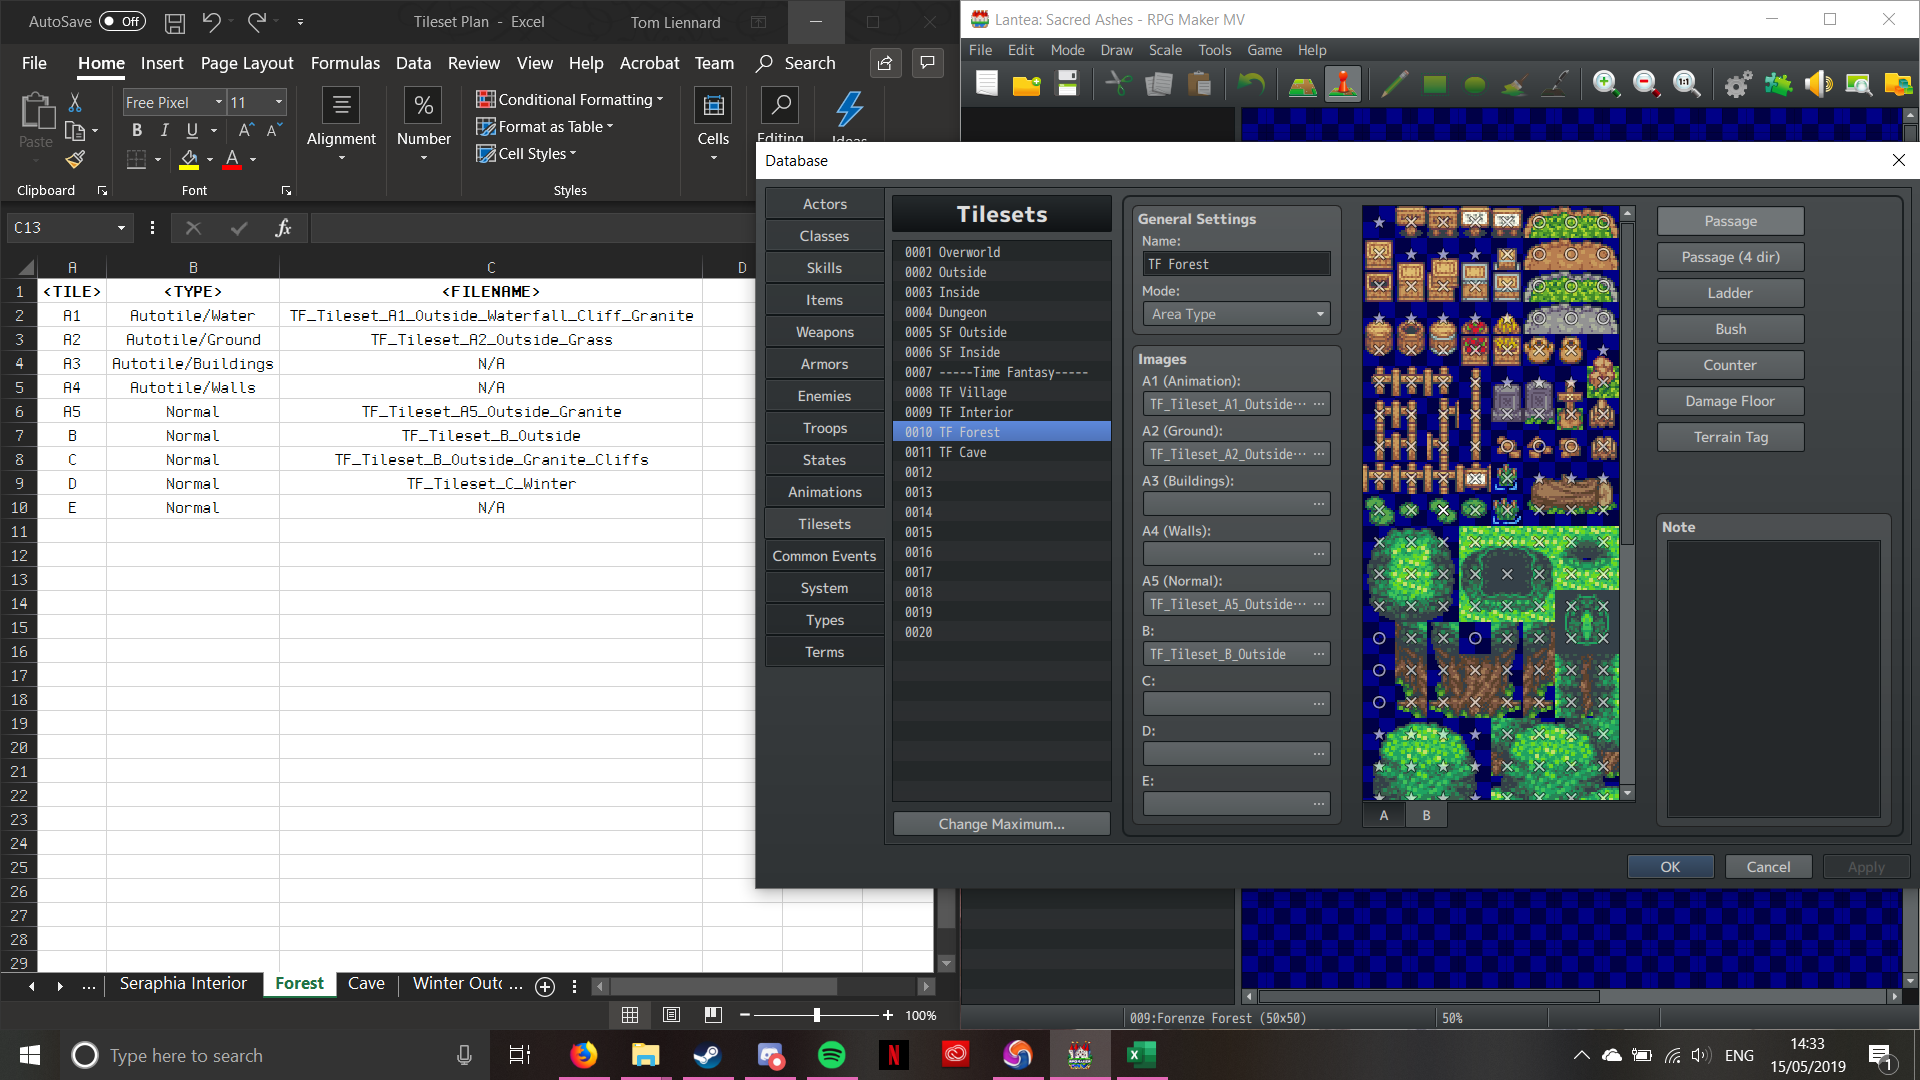
Now onto Tileset B. This one adds a new thing on passability; the ability to walk behind (indicated by a Star). One thing about Tileset B that’s important is that it’s vital to the rest of the tileset. WHATEVER YOU DO, DO NOT REMOVE THE STAR ON THE FIRST TILE!!! That star cntrolls the general passability. If set to Cross, then the player won’t be able to move at all; conversely, setting it to Circle will allow the player to walk on anything, ignoring the noraml passability setting. Leaving it as a star will make the passability work correctly. (A bit odd, isn’t it?). Anyhow, here’s the same process for the B Tileset (don’t forget about the Star passability!):
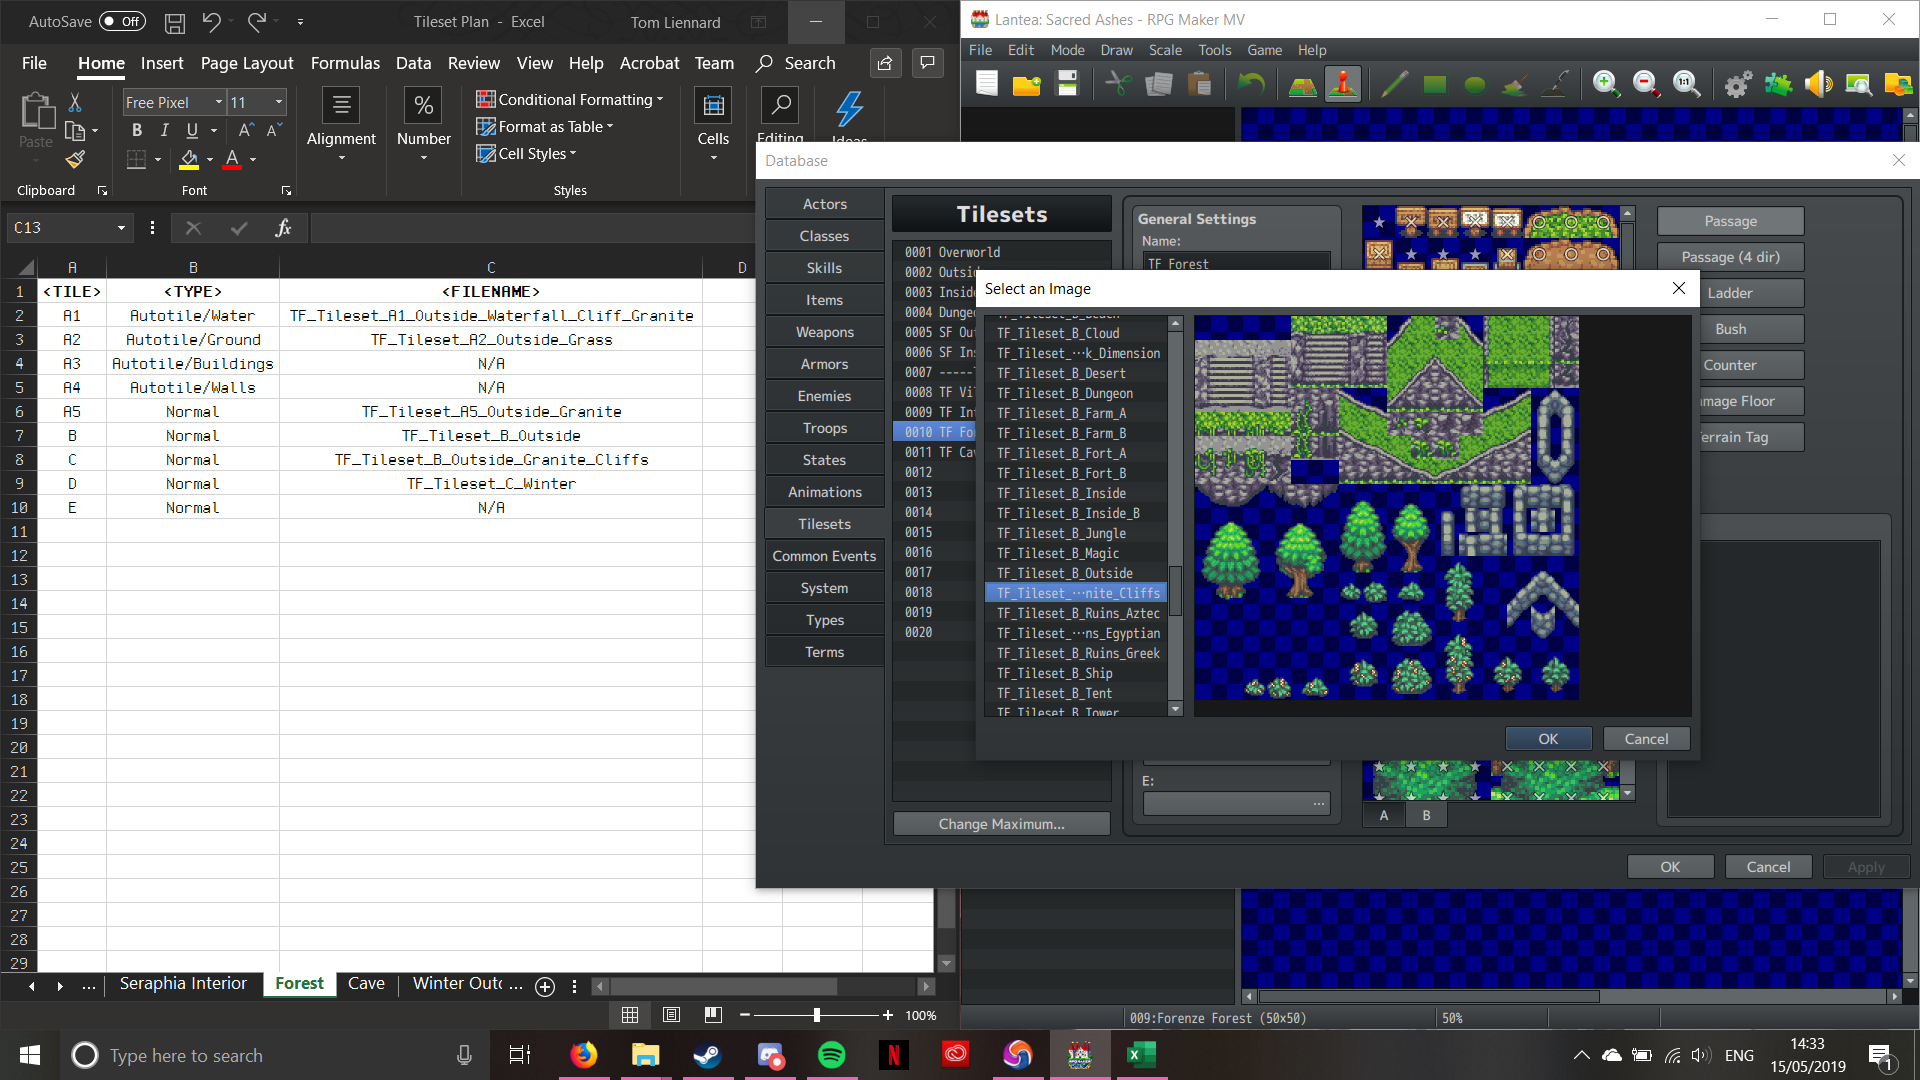
Tileset B – Select Image
Tileset B – Passability (See the Star in the top left?)
The rest of the tilesets work in the same way, minus the top left Star:
Tileset C – Image Select
Tileset C – Passability
Tileset D – Image Select
Tileset D – Passability
And there we go! One fully pre-planned, configured Tileset ready for use. This is the proccess I have to go through every time I create a new composite Tileset. It doesn’t half hurt your wrist though with all the clicking! The advantage of this tileset system is that you can re-use tilesets across the project, without having to reconfigure it for every single map. The drawback is the time required to properly set it up (as well as the pain from the clicking).
That’s it for now, and I’ll be back soon with some more stuff!
That looks a little confusing at first, but I created the naming convention in this way for a reason. Each section of the filename contains useful information for me. Here’s a summary of how this works:
<AssetSet> – This part of the filename tells me what set the asset belongs to, such as the default RTP or Time Fantasy. Why is this helpful? Well, it means I can have a unified aesthetic style, both visually and audibly.
<AssetType> – This tells me what sort of asset I’m dealing with, such as a Tileset, a Spritesheet, or any other sort of asset. This is helpful because it tells me where the specific asset belongs, what I can do with it, and how it’s been configured.
<AssetSubType> – Similarly to the <AssetType>, this tells me what kind of asset it is, but instead of being a general indication, it’s a more specific category. So I can tell if it’s an A1 Tileset, or an NPC Spritesheet. This helps me narrow down what I’m loking through, so I don’t waste time filtering through everything to find one specific asset.
<AssetDescription> – This one is pretty strightforward. It’s a description of what the asset is, which could be anything from Cliffs to Vampires.
<AssetNumber> – This one is only relevant if I have multiples of the same type of thing, or if it contains multiples of the same thing. If so, then I number them. That way I don’t have to try and rename every little thing, as PC’s aren’t brilliant at having two things with the same name.
So to put it into practice, I’m going to use this example:
TF_Spritesheet_NPC_Barmaid_1
So what this name tells me is that I have a Time Fantasy style asset, that’s a spritesheet. I know it’s an NPC (Non-Playable Character), and that it’s a Barmaid. As it has a number, it indicates that this isn’t the only Barmaid I have a spritesheet for. For another example:
RTP_Tileset_A5_Dungeon
This filename tells me that this is a default RTP (Run Time Package) asset. It’s a Tileset, configured to be an A5 component, and it’s for a Dungeon. As I only have one of it’s kind, it has no numerical suffix.
See? Nice and straightforward. This should help me keep organised during production.
So today, I’ll be talking about my mapping and tilesets. For those who are unaware, tilesets from the backbone of RPG Maker MV‘s mapping system. Each tileset is comprised of up to nine component tileset pieces, as follows:
A1 – Animated Water
A2 – Ground
A3 – Buildings
A4 – Walls
A5 – Normal
B – Normal
C – Normal
D – Normal
E – Normal
Now, you may notice that five of the nine tileset components start with the letter “A”. These denote “Autotiles”. When the engine draws Autotiles, it draws them as a continuous area, as opposed to as individual objects. This is particularly helpful when creating stretches of contiguous terrian. Sections A5, B, C, D, and E create individual objects.
Now for my tileset plan. I created an Excel document that details what tileset pieces I intend to use for each tileset:
If you’d like to know where I got the inspiration from, it’s simple. I based the interior maps on early Final Fantasy maps, and the village came from an area near where I live. In order to preserve a sense of scale, I measure my interior maps as 2x the size as the exterior building in tiles. This gives me room for the characters to move, but at the same time preserves some measure of consistency.
I’ve still got to create the “dungeon”-style maps that the player will adventure through. Luckily, I decided that the first dungeon area will be a forest, so I don’t have to create a new tileset to make it.
So that’s it from me for now. I’ll be back in a bit with some more development!
So this is the start of my Dev Log. In these posts, I’ll be talking about the production of my project (which still doesn’t have a name yet!), what I’m doing, how I’m doing it, and why I’m doing it. Now there are going to be plenty of links here to all of my research posts, so you can clearly see what the point of those posts were!
For this Dev Log #0, I’ll be talking about the engine and resources I’ll be using, why I’m using them, as well as anything else that’s interesting about them.
First off, I’d like to talk about the Game Engine I’ll be using: RPG Maker MV. Now this particular engine is the latest in a long running series of game engines, which are designed to create JRPG’s (Japanese Role-Playing Games). Now I could have used Unity or Unreal to make my game, as many modern JRPG’s such as Octopath Traveller and Dragon Quest XI: Echoes of an Elusive Age are made in Unreal, but as I’m trying to create something inspired by earler JRPG’s like Suikoden II, Dragon Quest VI: Realms of Revelation, or Golden Sun, I thought it would be better to use a system that’s purpose-built to make games in that style. Here’s the link to the official website for RMMV:
I know that Unity and Unreal can be used for free, and that RPG Maker MV costs money, but there’s a critical difference; RPG Maker DOESN’T charge royalties. Both Unity and Unreal also have paywalled features, whereas RPG MakerDOESN’T. So while it may be more technically limited, it actually works better for me (as well as tons of other people).
Now, RPG Maker MV (RMMV) runs of JavaScript, which allows it to easily export for web browsers and mobile devices, but I’m going to make mine for PC/Mac/Linux (I can do all three!). RMMV uses a visual scripting system for it’s basic functions, which makes getting a very basic prototype game up and running easily. It also uses a “Plugin” system, which enables the importation of .js files which can modify the game mechanics in ways the engine cannot do normally. One of the more prolific scripters for RMMV is Yanfly, who’s Plugin library contains around 200 Plugins! Here’s the link to his website, where you can get all of his plugins for free!:
On to Graphics and Music. Well, I’ve already decided that I’m not going to use the stock assets for RMMV. Whilst they’re nice and all, they are very generic. Also, there is quite a stigma against RMMV games that use stock assets, so I’ve had to look into a new asset style.
And I found one: a set called Time Fantasy. Now, I know that these assets are paid ones, but I’ve had them for a few years now, so I haven’t had to really invest any more money. Time Fantasy‘s style is reminiscent of games such as Final Fantasy VI or Chrono Trigger, so they’re perfectly ideal for the style of game I’m going for. Now, there are so many Time Fantasy packs, but luckily, I have the lot. Here’s a list of the Time Fantasy asset packs out there (as well as the link to where you can get them!):
Time Fantasy – Core Pack
Time Fantasy – Monsters
Time Fantasy – Animals
Time Fantasy – Elves vs. Dwarves
Time Fantasy – Farm and Fort
Time Fantasy – Ship
Time Fantasy – Pixel Animations
Time Fantasy – Winter
Time Fantasy – Future Fantasy
Time Fantasy – Lich Crusades (Patreon Exclusive)
Time Fantasy – Ruined Dungeons
Time Fantasy – Animated NPC’s
Time Fantasy – Mythical Monsters (Patreon Exclusive)
Now, some of these asset packs are Patreon Exclusive. For those who don’t know, Patreon is a crowd-funding website that’s been quite popular with the RMMV community. Creators often use this as both a portfolio and as a way of making a living. They can set tiers of support, which costs differing amounts of money per month. Time Fantasy‘s creator Jason Perry (also known as Final Boss Blues or Despain) has set three tiers of subscription; $1, $5, and $10 (I proudly support at the $10 level!). Each level gives access to new things, as well as discounts and freebies. Here’s the link to Patreon:
BEFORE ANYONE GETS ON THEIR HIGH HORSE ABOUT ME NOT MAKING MY OWN ASSETS: I’m not very good at art. My hand-eye co-ordination isn’t good enough (and I’ve been told by my doctor that it’ll never get better) to make my own art. So I see no reason not to support those who do, and in return get some art that I can use. It’s common sense, as well as an industry standard practice (you wouldn’t expect the programmer to make art, would you?).
There’s a reason I chose this particular style though; its reminiscent of a game called “Chrono Trigger“, which is generally considered to be the best JRPG that’s ever been made. I’ve looked at other styles though:
My 16-Bit Graphics Mood Board
Although all of the styles that I’ve looked at are really beautiful, I didn’t get wowed by that many of them. Admittedly, I was tempted by the grey-scale colour palette, but I’m going for retro, not downright archaic! Another thing that I’ve been trying to steer clear of is large amunts of detailing. It makes the graphics look gorgeous, but takes more time to make, more space to store, and more processing power to run. By keeping with a lower pixel count, I can keep the graphical size down, which leaves more room for programming and gameplay functionality. It also helps keep compatibility in check. Often a more “Modern” game requires more power and a more advanced operating system to run. By keeping the graphics simple, it alleviates some of these requirements, making it easier for low-spec hardware to run.
As for music, I’m having to invest in that too, as I haven’t got a clue how to make it (I would love to learn, but the software is generally Mac Exclusive, and I have a PC). So here’s a list of the music I’m planning on using, with links:
8-Bit Perfect Collection – (Designed for use with Time Fantasy)
Retro Fantasy Music Pack – Vol. 1
Retro Fantasy Music Pack – Vol. 2
Retro Fantasy Music Pack – Vol. 3 (Yet to be aquired at this time)
The Retro Fantasy Music Packs are made by Joel Stuedler, who makes quite a few music packs for RMMV, with varying themes such as Horror, Sci-Fi, and Action/Adventure. All of the music is also what’s known as “Chiptune“, which sounds like the game’s running on a SNES (Super Nintendo Entertainment System)! Seeing as that’s the style I’m going for, I thought that some classic-sounding music would work a treat!
So there we have it! An asset list and engine breakdown all in one. Next Dev Log should be me actually making something! Later!
Patreon. (n.d.). finalbossblues is creating Pixel Art Game Assets | Patreon. [online] Available at: https://www.patreon.com/finalbossblues/ [Accessed 9 May 2019].
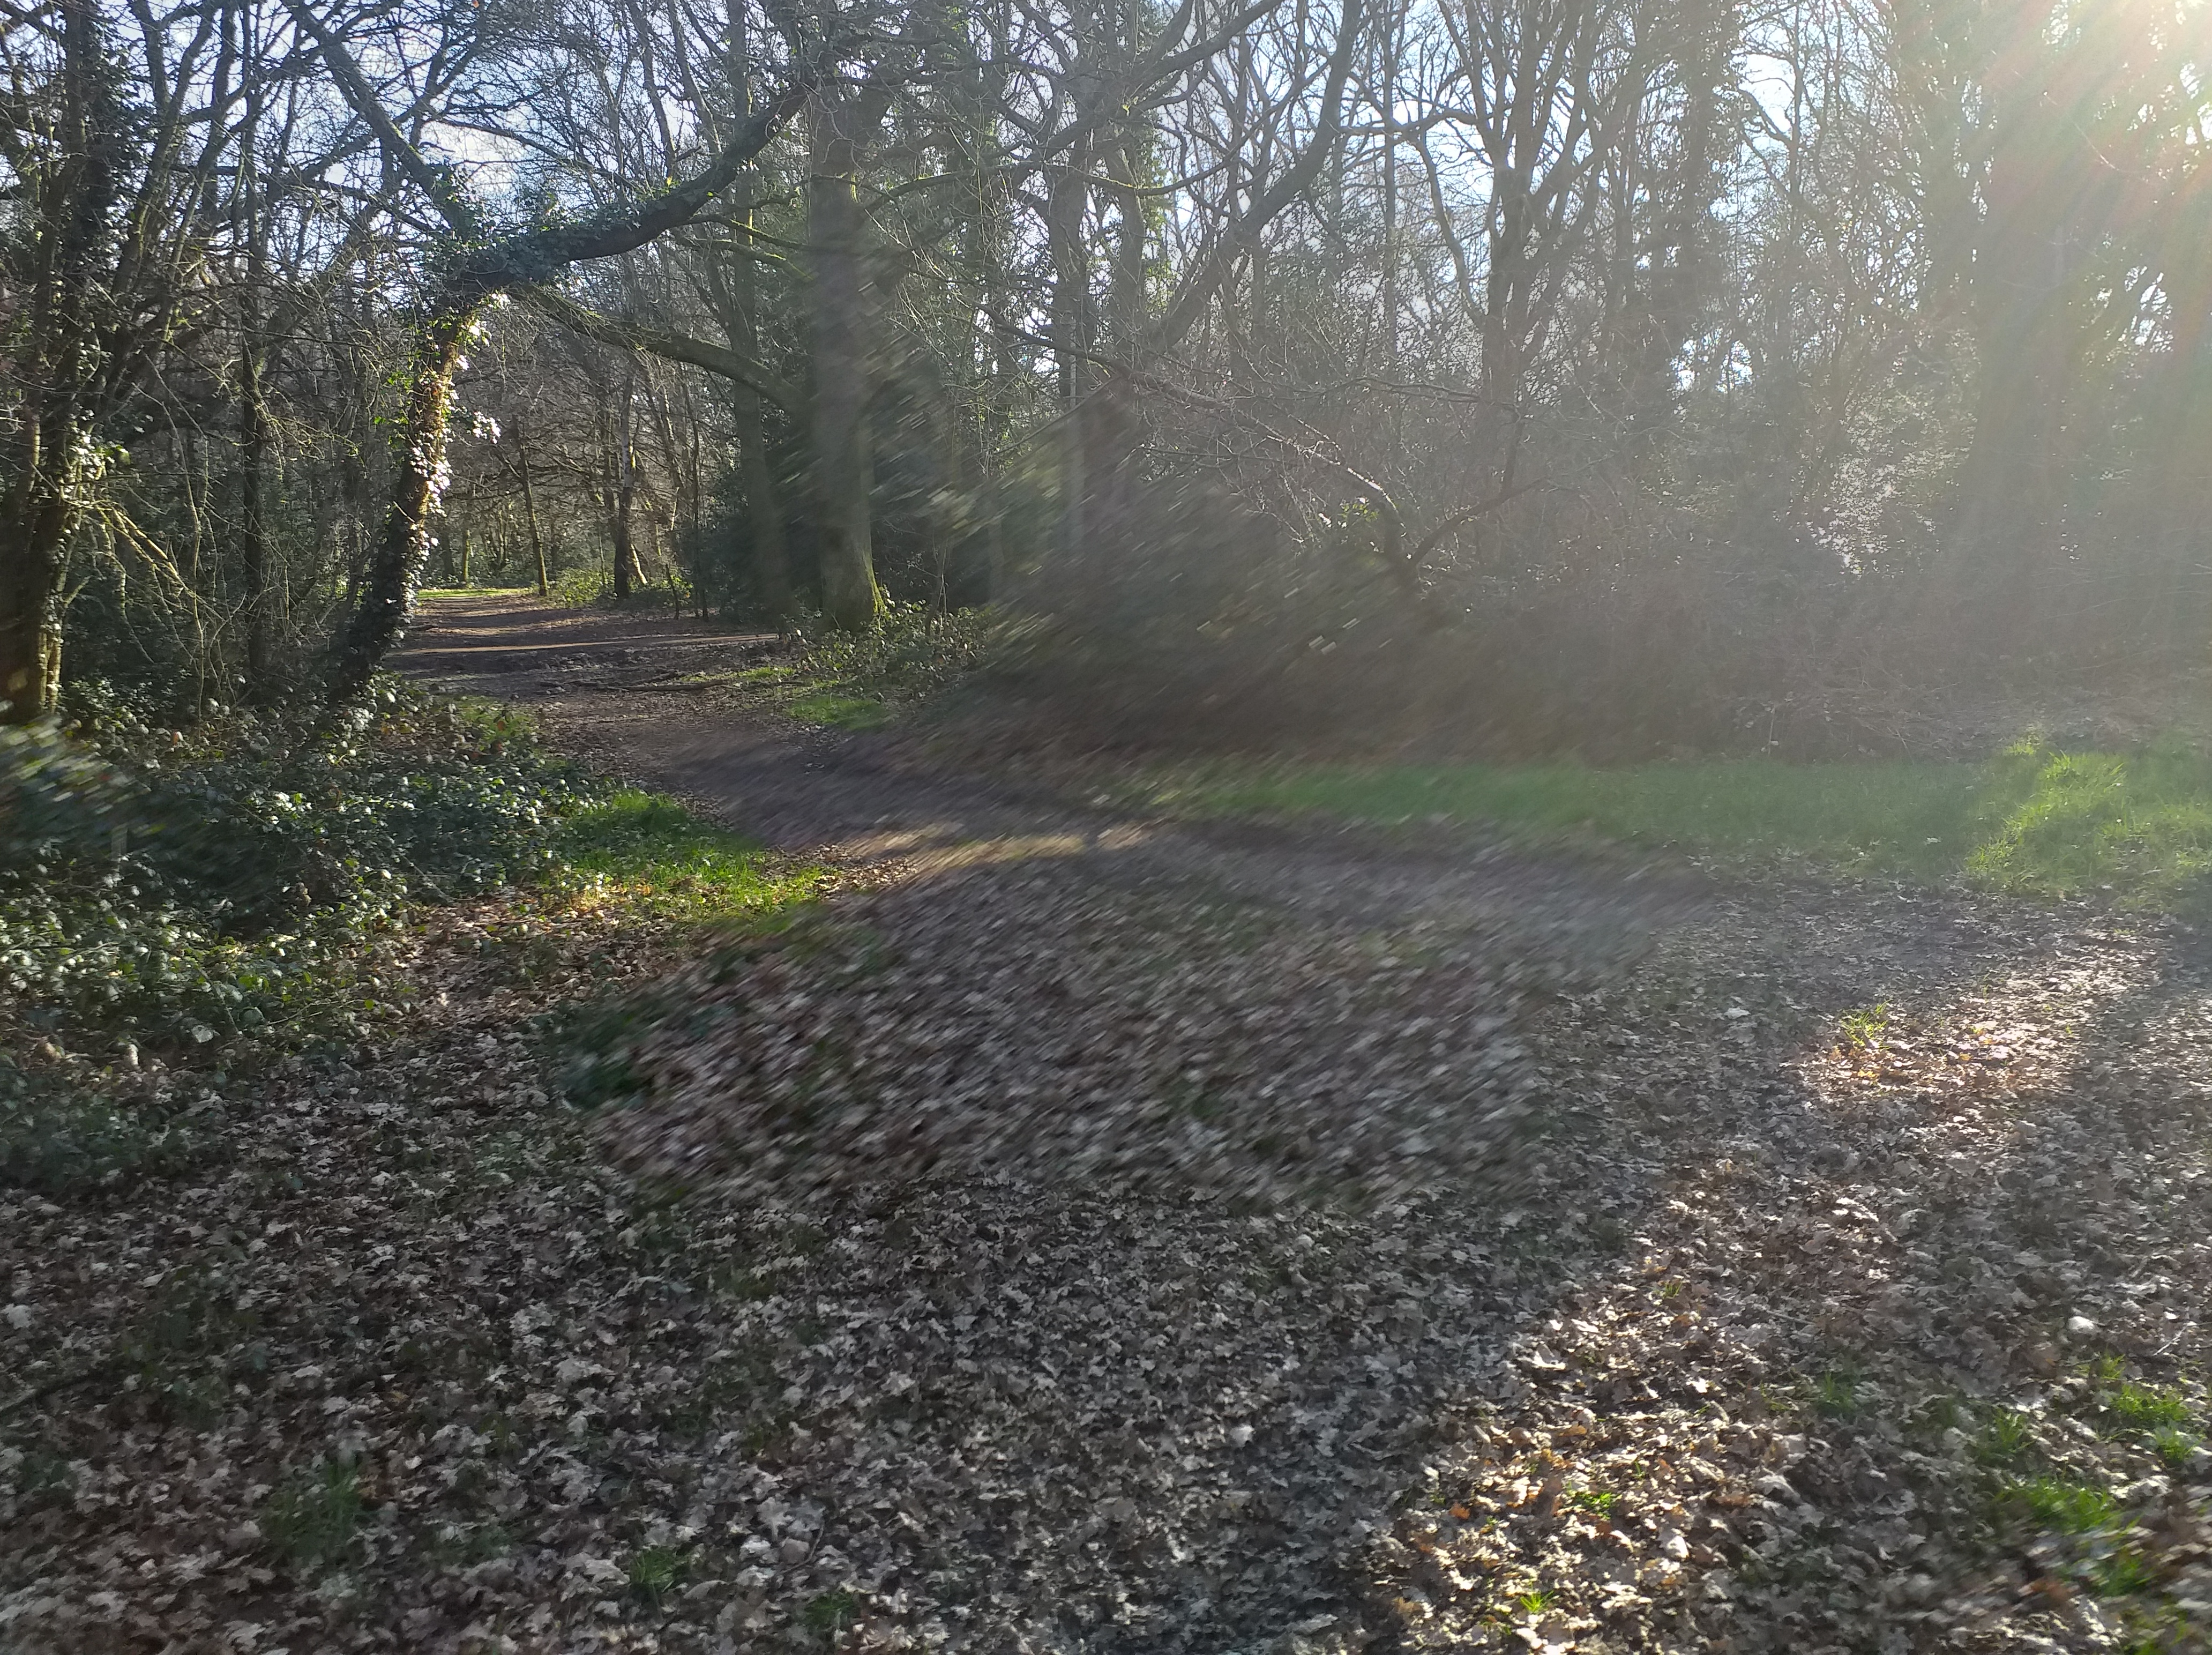
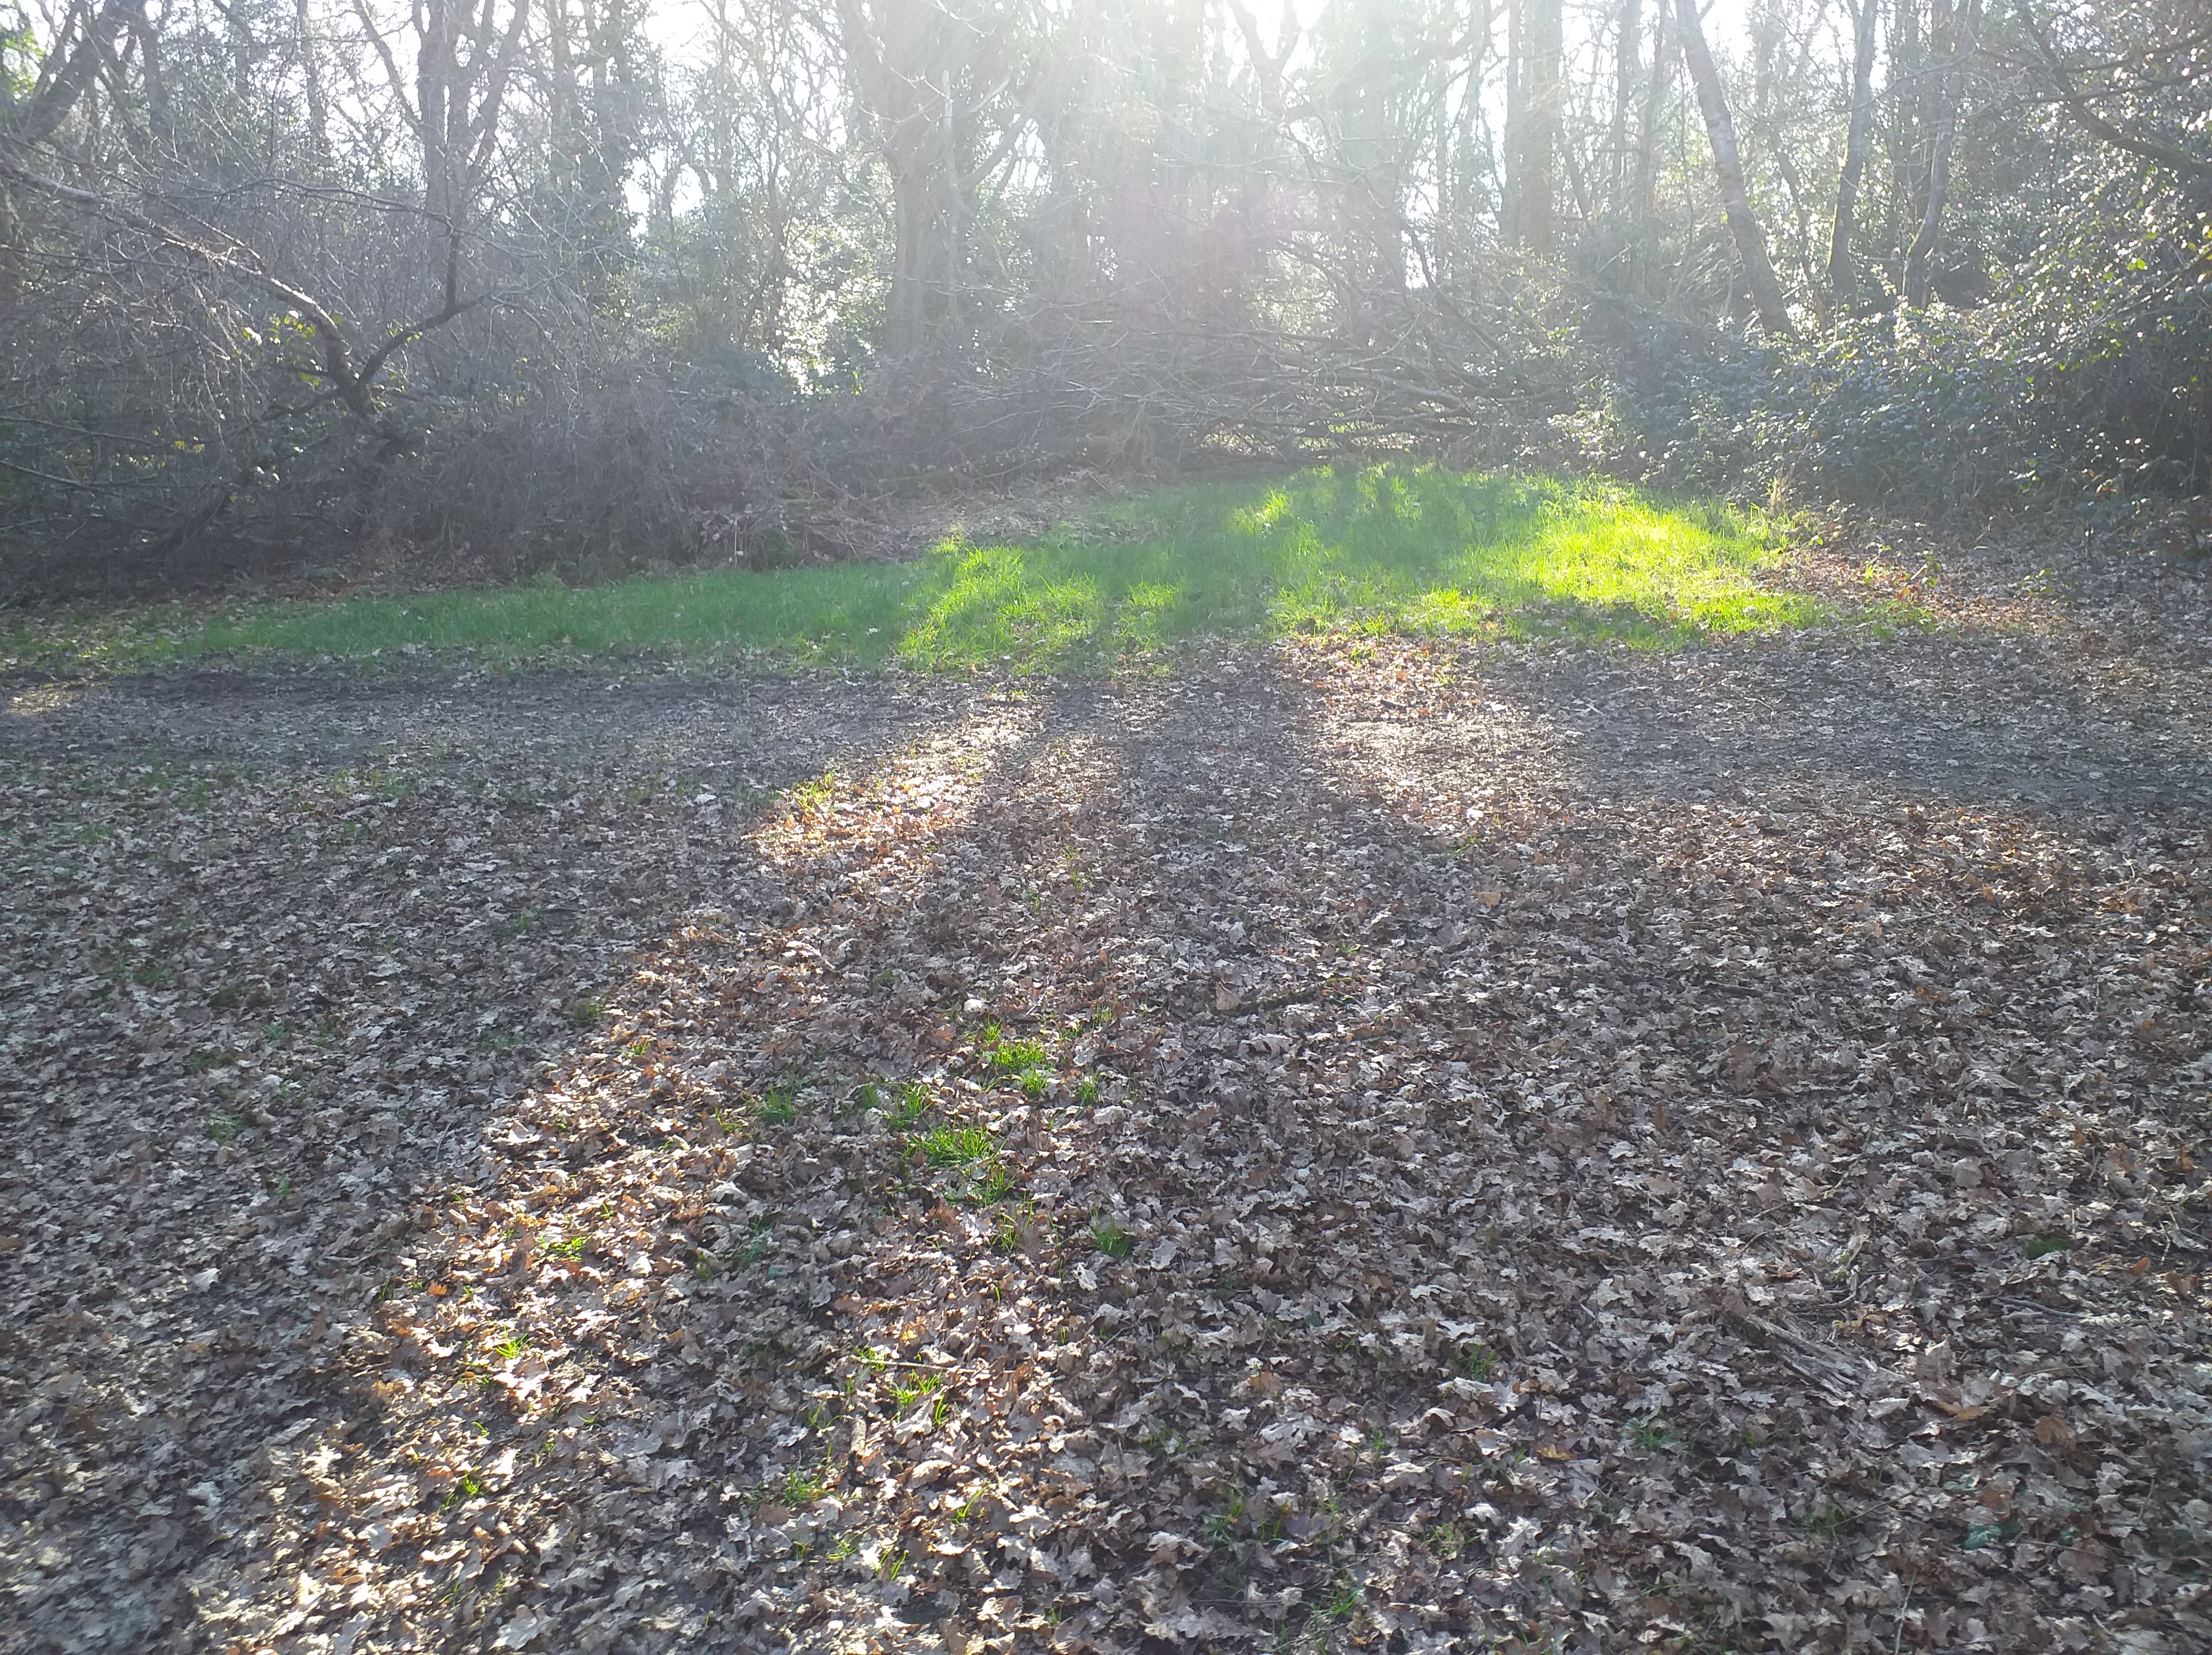
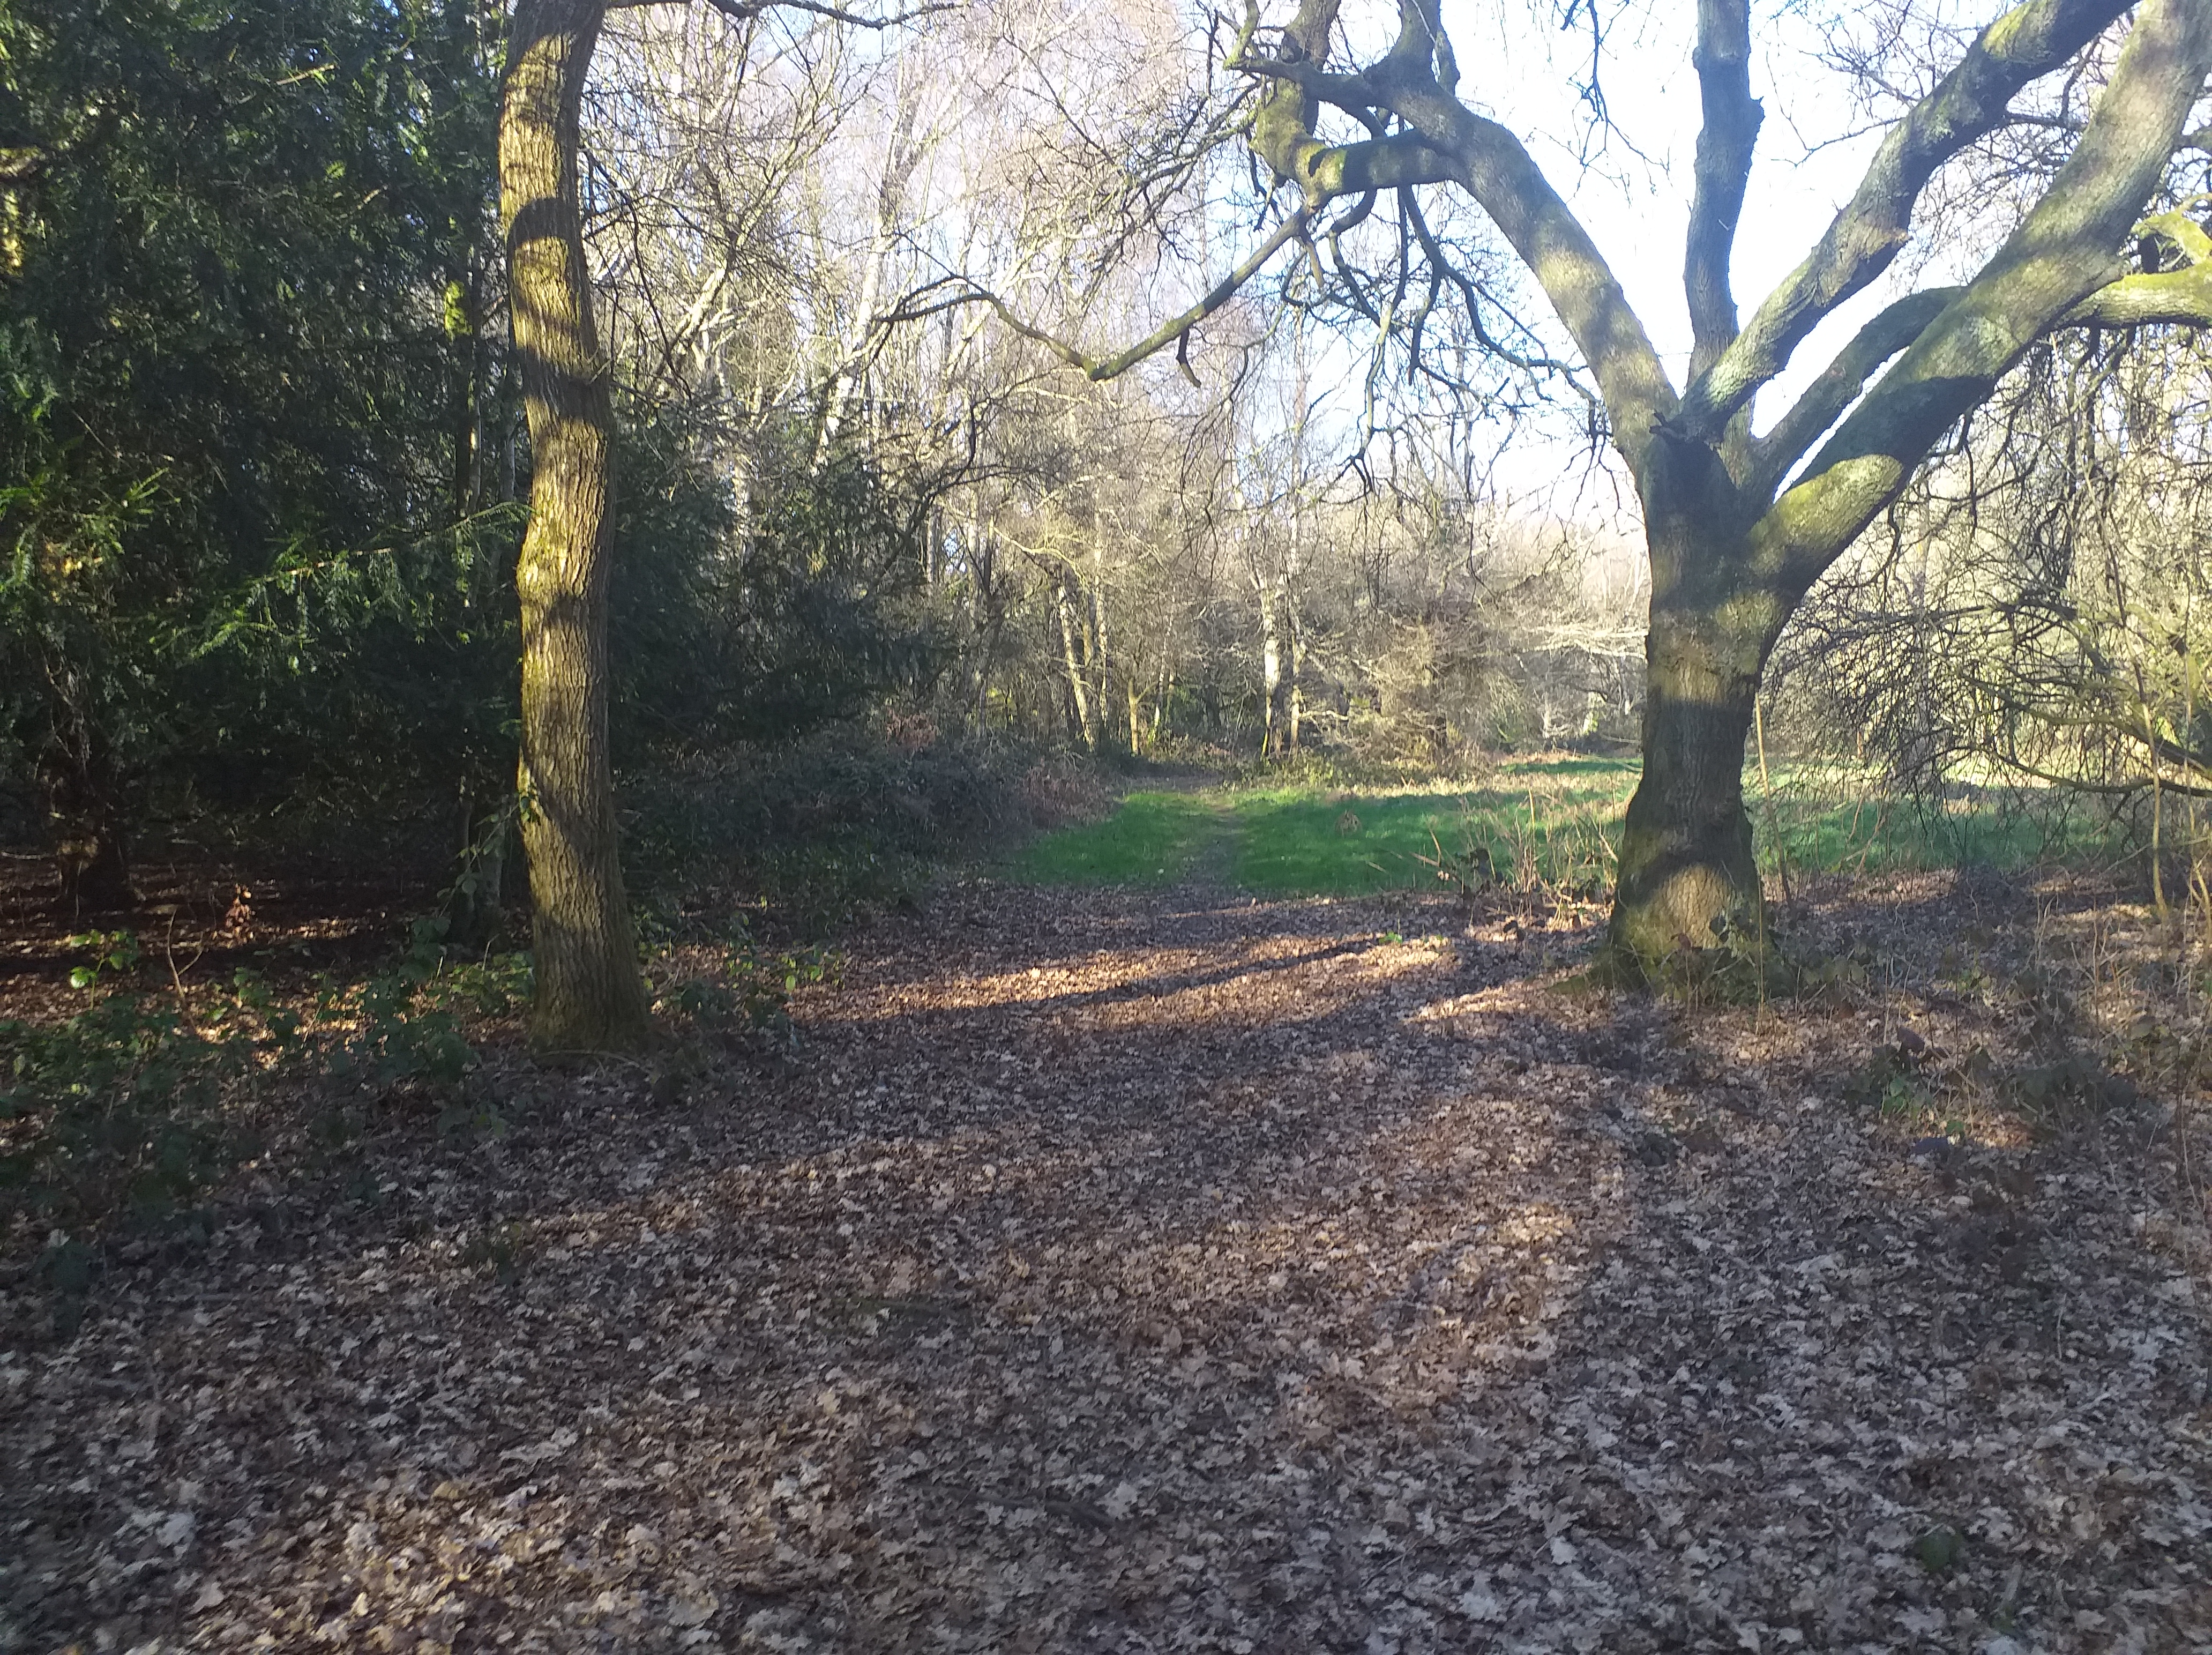
Before I start on the mapping, I thought it may be a good idea to take some test shots of the kind of area I wanted. As I live near a lot of woodland, I thought I’d go for a forest-type area for my starting area. I went down to the woods (about a 15 minute walk from my house), and took some photos. The lighting wasn’t particularly brilliant, but it was more to give me a general idea of what I wanted. Unfortunately, my camera wouldn’t save the images I took, so I dug these ones out from a project I did a few years ago. That’s why there are autumnal leaves on the ground!
One thing I’ve noticed about forests; all of the paths are quite narrow. This may mean that I create a narrower map area. Also, there are sporadic trees littered along the paths, that don’t connect to anything else. These could be useful for decoration.
I’m gonna sign off now, but I should be back soon with soem more content!
I’ve had a thought about how to do my character’s hometown; make it the SAME town as I used in my previous project: Legend of Dragonstone Mountain. I was thinking of bringing some kind of plot continuity from my previos project, but I could never work out how to do it. Well, considering that I want to use the same types of map, I may as well recycle some of my own material and incorporate it into this current game. I can also bring forward all of my old skills, items, weapons, armour, and spells, and then add to them, or adjust them as required.
I know that may sound a little bit blaggy. But think of it this way; recurring game elements. It’s not an unusual concept, as most game series use the same premise. What I’d prefer to do is build upon mechanics and narrative I KNOW works. I’ll see what I can do. At the very least, I’d prefer to rebuild my old maps, as they were quite well sorted. One of the issues with the maps I’m currently testing is that I think they’re too big and spacious. If you look at the genre and time perios that I’ve been looking at, the maps were far more compact. Also, large maps leads to a need to fill them with rubbish, just to pad out the space. I know 3D games can get away with having large, detailed maps, but 2D games often have a size limit, as they used to be for handheld consoles, and now more recently, mobile devices. These consoles don’t have the memory space or power to run overly large, complicated maps as well as making the mechanics work.
So there we go. I’m gonna set up my initial story now, and then get to the statting this afternoon. So until later!
Last night, I had a little bit of a rethink about what kind of opening I want. Obviously, I dn’t want to change it too much, but at the same time, I’d like to make something a little bit more dungeon crawler-y, so I can make some simple puzzle mechanics, so it’s not all about being a total murder-hobo.
I want to stick with a forest as a low-level combat area, but I’m thinking of adding some kind of cave or ruins (or something), which could be a bit more challenging. I know thats making a little bit more work for me, but at the same time, I want to add a little variation to the gameplay.
So there we go. I should be sorting the statting and balancing out later today, and I’l show you kind of what I have, as I have it. So until then!
After using the FSM Sample Maps, I noticed something; they’re a little over-detailed, as well as being a bit to large and empty in places. I’m thinking of building some totally custom maps using the Time Fantasy asset style. Only problem is that I don’t really know where to start with it. I’ve never been particularly good at MV mapping, so I think I’d find it a struggle.
Another thing that’s happened is a little something wrong with the battle system; I was planning on using an Active Time Battle (ATB) system, but when using Olivia’s Sideview Battle UI plugin, it doesn’t show the ATB gauge. Without that one simple thing the ATB system becomes a nightmare for players. I’m looking through the plugins code to see how it draws the UI, and then modify it to draw the ATB gauge. Only thing is that I haven’t got a clue about how MV plugins go together, so I’m worried that I’m gonna break it.
If the ATB system doesn’t want to play nice, I do have a backup system called Standard Turn Battle. It’s kind of like the one used in Octopath Traveller or Final Fantasy X (yes, that one again). Personally, I’m not too happy with this chain of events, but I’m hoping to have a demo ready by sometime Saturday. I’m also putting a survey link in with it, so I can get some feedback. It’s located with the manual that I’ve put together. The manual has the controls and stats listed.
I really should dig out some of my old game manuals so I can get an idea of layout, for later in the project when I can create an illustrated one. I’m debating, if I have enough time, if I should make some promotional material for this project.
Oh, and I found out about the Diploma Show, where me, and every other art, design, and media student displays their work. It’s in roughly the middle of June, so that gives me some time to sort out some bumph for my game.
So there we have it. Like I said, I should have a demo ready soon, so stay tuned!